
Certification guide
Google Cybersecurity Certification: Is It Worth It in 2026?
In 2026, entry-level cybersecurity roles still cluster around $55,000 to $80,000, and that is exactly why the Google Cybersecurity Certificate deserves a colder reading than most marketing copy gives it [1]. It is useful. It is also easy to overrate. For a reader trying to break into commercial security operations, the certificate can help organize the basics: SIEM concepts, incident handling, Linux, SQL, Python, and the vocabulary employers expect in junior analyst interviews. For a reader aiming at cleared hiring, though, it is a warm-up credential, not the credential that closes the loop for Top Secret / Sensitive Compartmented Information (TS/SCI) pathways.
That distinction matters because the market does not price all security signals equally. Entry-level cybersecurity roles across the broader commercial market tend to sit around $55,000 to $80,000, while cleared entry-level roles can run closer to $65,000 to $100,000 once a sponsor, a clearance path, and the right baseline certs enter the equation [1][2]. The Google certificate may help you get onto the field. It does not, by itself, move you into the stronger salary band.
The better way to think about it is simple: Google’s program can make a beginner more employable than a beginner with no portfolio, no projects, and no cyber vocabulary. It does not replace CompTIA Security+ for DoD-oriented hiring, and it does not carry the same employer shorthand as the certs most defense contractors already screen for. If your goal is a first cyber job, it can be worth it. If your goal is a cleared cyber job, it should usually be paired with a more explicit next step.
What is the Google Cybersecurity Certificate, exactly?
The Google Cybersecurity Certificate is a Coursera-hosted training program aimed at beginners. Its appeal is obvious: low friction, consumer-friendly pacing, recognizable brand, and a curriculum that feels more practical than a dry exam-prep book. Readers searching this term are usually asking two different questions at once. First: what do you actually learn? Second: does any employer care?
On the learning side, the program covers many of the right foundations. It introduces security principles, common attack types, incident response basics, Linux usage, SQL queries, Python scripting, and hands-on exposure to analyst-style workflows. That is not trivial. A candidate who completes the program seriously should come away better able to discuss log review, access control, phishing, packet analysis, and basic triage than someone who only watched YouTube clips about “getting into cyber.”
The weakness is not the curriculum. The weakness is signaling. Employers do not hire curricula. They hire evidence. The Google certificate can be one piece of evidence, but it usually needs support from projects, labs, a better-known certification track, or some adjacent technical experience. In other words, it teaches enough to matter. It does not signal enough to stand alone.
| Dimension | Google Cybersecurity Certificate | What it means in practice |
|---|---|---|
| Delivery | Online, Coursera-based | Accessible for career changers and self-paced learners |
| Audience | Beginners | Best for readers without prior cyber experience |
| Topics | Linux, SQL, Python, SIEM, incident response | Useful operational exposure for junior roles |
| Brand signal | Google / Coursera | Recognizable, but weaker than established cert brands in cleared hiring |
| DoD alignment | Indirect | Does not carry the same procurement-era shorthand as Security+ |
Is the Google Cybersecurity Certificate worth it in 2026?
For the right person, yes. For the wrong person, not really. The right buyer is a beginner who needs structure, wants a low-cost starting point, and is still figuring out whether cybersecurity work is actually interesting enough to pursue seriously. The certificate gives that person a guided path instead of a chaotic pile of bookmarks.
It is especially useful for career changers coming from customer support, help desk, admin work, or nontechnical office jobs. Those readers often do not need another motivational speech. They need a sequence. Google’s program offers one. It can help a candidate build fluency around terms that otherwise make entry-level job descriptions look more intimidating than they are.
But “worth it” changes once the target outcome becomes more specific. If the goal is “land any junior cyber-adjacent interview,” the certificate can be worth the money and time. If the goal is “be competitive for defense contractor analyst roles,” it is much less compelling as a terminal move. In that setting, better-known cybersecurity certifications still carry more weight because hiring managers already know how to map them to expected baseline knowledge.
The Google certificate is best understood as a starting asset, not a finishing asset.
That sounds less glamorous, but it is more honest. Too much of the content around this keyword swings between hype and dismissal. The reality is narrower: useful, respectable, but rarely decisive.
Does the Google Cybersecurity Certificate help you get a job?
It can help you get interviews for the kinds of roles where employers are open to training beginners. That usually means junior SOC tracks, security support functions, IT support roles with a security slant, trust-and-safety work, or broad entry-level analyst funnels where a recruiter wants evidence that the candidate has done more than “be interested in cyber.”
That last point matters. A certificate does not need to guarantee a job to be useful. Sometimes it only needs to solve a narrower problem: proving that the applicant has completed a body of work, can talk coherently about logs and alerts, and is not starting from zero. For some hiring managers, that is enough to justify a screening call.
Where it helps less is in markets that depend on clearer baseline filters. Defense programs and government-adjacent teams often rely on certifications that map cleanly to contract requirements, internal ladders, or established hiring habits. That is one reason readers targeting the cleared market should spend time with entry-level cybersecurity jobs that actually show how employers stack credentials, sponsorship, and role readiness.
The certificate also helps more when paired with visible proof of work. A home lab. A small log analysis project. A write-up of an incident simulation. A GitHub repo with Python utilities. A short portfolio beats a bare certificate line every time. Employers usually trust demonstrated effort more than course completion alone.
Can the Google Cybersecurity Certificate replace Security+?
No. Not in the part of the market that most CyberSecJobs readers care about. Google’s certificate and Security+ are not interchangeable signals, even when they overlap on some topics. One is a beginner training program with a strong consumer brand. The other is a standardized certification that has long been treated as a baseline credential across government and contractor environments.
That does not mean Security+ is automatically “better” in every educational sense. In some ways, Google’s program may feel more concrete to beginners because it includes workflow-oriented exposure rather than pure exam framing. But employers do not always reward the thing that felt most educational. They reward the thing they already understand.
That is why the comparison needs to be framed around hiring utility, not only content quality. In defense hiring, Security+ remains easier to parse. It fits the mental checklist. It aligns with how many recruiters, program managers, and compliance-heavy organizations think about baseline readiness. If a reader wants to work in the commercial sector first and later transition, Google’s certificate can still be a useful first move. If a reader is already focused on cleared pathways, skipping straight to Security+ often makes more strategic sense.
| Question | Google Certificate | Security+ |
|---|---|---|
| Best for absolute beginners | Yes | Sometimes, but less guided |
| Recognized by defense employers | Limited | Strong |
| Useful for structured learning | Strong | Moderate |
| Useful for DoD-oriented screening | Weak | Strong |
| Best role in a career plan | Ramp-up credential | Baseline market credential |
A good compromise for some readers is sequencing rather than choosing. Do the Google certificate if you need the structure. Then convert that momentum into Security+, labs, and a more explicit job-search strategy. That is a better stack than pretending one credential can do every job.
Which jobs can you realistically target after finishing it?
The realistic answer is narrower than the marketing copy. You are not suddenly competitive for every “cybersecurity analyst” job with the certificate alone. But you are more plausible for certain first-step roles, especially if your background already includes customer support, IT troubleshooting, system administration, or operations work.
The most realistic targets are junior SOC analyst roles, security operations support, trust-and-safety teams, IT support roles that touch identity or access, and certain vulnerability-management or compliance-support positions where employers are willing to train. That aligns with the broader early-career market: entry-level cybersecurity pay in commercial settings commonly falls around $55,000 to $80,000, while verified Tier 1 SOC analyst ranges sit at $55,000-$78,000 commercially and $65,000-$95,000 in cleared environments [1][3][4]. The gap is not just about skill. It is about market context.
That matters for expectation-setting. If someone sells the Google certificate as a direct line to six figures, they are either describing an unusually good edge case or skipping the intermediate steps. The normal path looks more like this: certificate, project work, first junior role, stronger baseline cert, then movement into better-paying tracks. A clearer view of those tracks lives in our broader breakdown of cybersecurity jobs, where the role categories make more sense than the catch-all keyword does.
Readers who already know they prefer defense-side work should also compare job families. A candidate interested in monitoring and alert triage should read cleared SOC analyst jobs. A candidate leaning toward systems hardening or architecture should compare the path toward cleared security engineer roles. The Google certificate can sit at the start of those routes. It does not substitute for the rest of the route.
Readers leaning toward infrastructure-heavy paths should compare cloud security engineer roles for cleared professionals, DevSecOps engineer career paths, and application security engineering tracks. Those routes demand more technical depth than this certificate alone, but they show where an entry credential can lead.
What salary can you expect after the Google Cybersecurity Certificate?
The honest salary answer is that the certificate itself does not command a market rate. Roles do. The certificate only matters insofar as it helps you qualify for one of those roles. That sounds obvious, but many people search this term as if a course completion badge directly produces a compensation bracket. It does not. Compensation follows the labor category, the employer, the clearance environment, and the evidence that you can operate in the seat. A training credential helps only when it changes how a recruiter reads your probability of success in that seat.
For broad entry-level cybersecurity roles, a realistic commercial range is about $55,000 to $80,000 [1]. For Tier 1 SOC analyst roles, verified ranges sit at $55,000-$78,000 commercially and $65,000-$95,000 in cleared environments depending on employer mix and program context [3][4]. Once a professional moves into security engineering tracks, the compensation band climbs much faster, with commercial roles at roughly $85,000 to $160,000 and cleared roles around $110,000 to $200,000 [5].
Clearance status is part of that story. Verified clearance premiums in the reference set run at +$10,000-$20,000 for Secret, +$20,000-$35,000 for Top Secret, and +$30,000-$45,000 for Top Secret / Sensitive Compartmented Information (TS/SCI) roles in the cited market comparisons [2][6][7]. The Google certificate does not create those premiums. It only helps if it gets you into the pipeline that can eventually access them.
$55,000-$80,000
$55,000-$78,000
$65,000-$95,000
$110,000-$200,000
That is why the better financial question is not “what does the Google certificate pay?” It is “what next move does it make possible?” If the answer is “my first analyst interview,” that can still be a very good return.
How does it compare with ISC2 and CompTIA certifications?
Coursera’s Google certificate, ISC2’s entry-level options, and CompTIA’s certification stack are all trying to solve slightly different problems. Google’s strength is accessibility. It is designed to bring a newcomer into the field without assuming prior depth. ISC2 brings stronger certification-brand credibility and clearer long-run alignment with professional identity. CompTIA, especially Security+, remains the strongest practical comparison for readers asking about hiring utility.
That is because CompTIA’s ecosystem is legible to employers. Security+ does not need much explanation. Recruiters know it. Hiring managers know it. Defense contractors know it. That familiarity is not everything, but it matters. By contrast, the Google certificate often needs interpretation: was this candidate just browsing, or did they actually acquire usable skills?
ISC2 sits somewhere in between for many readers. It has institutional credibility, but for this exact keyword it is usually not the main comparison. The real commercial-intent question underneath the search is whether Google’s program is enough, or whether the reader should put the same time into Security+ instead. In cleared-market terms, the answer is usually Security+ first or Security+ next.
For readers trying to control cost, the smarter approach may be stacking cheap, credible signals. Use the Google certificate for structure. Add labs. Add a stronger cert. Add targeted reading from free cybersecurity certification and training options where they fill real gaps. Cheap is good. Cheap and legible is better.
What should cleared or clearance-track candidates do instead?
If you are targeting defense hiring from the start, the better plan is usually to treat the Google certificate as optional. Not useless. Optional. Your highest-probability route is often some combination of Security+, home lab work, tactical resume positioning, and applying into roles where employers are open to candidates who can grow into the mission. That is less marketable than “get this Google certificate and change your life,” but it is more aligned with how cleared hiring actually works.
A practical sequence looks like this: first, build enough basic fluency that job descriptions stop looking like a foreign language. Second, earn the baseline credential most relevant employers already recognize. Third, narrow toward a role family such as SOC, blue team, cloud security, or security engineering. Fourth, keep stacking evidence of competence. The Google certificate can be step one. It should rarely be step four.
If you want a broader market map before picking a lane, review cleared blue team jobs, cleared vulnerability analyst roles, cleared incident responder paths, and security architect career progression. Then browse cybersecurity job categories and browse entry-level cybersecurity roles with a clearer sense of what each credential actually signals.
Browse cleared cybersecurity roles once you have the mix of baseline knowledge, recognized certification, and project evidence that employers can price confidently.
Readers who are already in adjacent IT work may not need it at all. Someone with help desk experience, Active Directory exposure, ticketing discipline, and a serious Security+ study plan may get more mileage from skipping the Google path and moving straight into employer-recognized signals. For a total beginner, though, the certificate can still be the cleanest way to stop drifting and start building.
Frequently asked questions about the Google Cybersecurity Certificate
Is the Google Cybersecurity Certificate enough to get a job?
Sometimes for junior commercial roles, but usually not by itself. It works better when paired with projects, labs, and a stronger certification path.
Is the Google Cybersecurity Certificate better than Security+?
For structured beginner learning, it may feel easier to absorb. For cleared hiring and defense-side screening, Security+ is usually more valuable.
Can the Google Cybersecurity Certificate help with cleared jobs?
Indirectly. It can build baseline knowledge, but it is not the credential most cleared employers use as a primary signal.
What is the best next step after finishing it?
Usually Security+, role-specific labs, and applications into junior analyst or support-adjacent roles that let you accumulate real operating experience.
Sources
[1] Programs.com cybersecurity salary 2026 summary, pulled into verified-salaries-2026.json.
[2] EpicDetect clearance premium data, pulled into verified-salaries-2026.json.
[3] Salary.com SOC Analyst median data, pulled into verified-salaries-2026.json.
[4] Dropzone.ai SOC Analyst 2026 guide and Glassdoor aerospace/defense SOC analyst median, pulled into verified-salaries-2026.json.
[5] Programs.com senior security engineer compensation summary, pulled into verified-salaries-2026.json.
[6] ZipRecruiter TS/SCI salary differential summary, pulled into verified-salaries-2026.json.
[7] CyberSecJobs internal cleared-market salary reference set, pulled into verified-salaries-2026.json.
Burp Suite for Cleared Web App Pen Testers Skills Guide
Burp Suite is a must-have tool for penetration testers working in secure and classified environments. It offers unmatched capabilities to find vulnerabilities in web applications, ensuring systems are safeguarded against attackers. This guide covers everything you need to know – from setting up Burp Suite in high-security environments to using its tools like Proxy, Repeater, and Intruder for effective testing.
Key takeaways:
- Why Burp Suite Matters: Essential for cleared professionals due to its ability to analyze complex infrastructures while maintaining strict data control.
- Core Tools: Proxy for traffic interception, Repeater for manual testing, and Intruder for automated attacks.
- Setup in Secure Environments: Focus on air-gapped networks, strict access controls, and compliance protocols.
- Advanced Features: Extensions like Turbo Intruder, Param Miner, and Taborator expand its functionality.
- Reporting: Generate detailed or summary reports tailored to stakeholders, with options for compliance frameworks like OWASP Top 10 or PCI DSS.
Whether you’re testing DoD systems or classified apps, Burp Suite helps you identify issues like SQL injection, XSS, and IDOR while maintaining compliance and precision.
Master Burp Suite Like A Pro In Just 1 Hour
sbb-itb-bf7aa6b
Installing and Configuring Burp Suite in Secure Environments
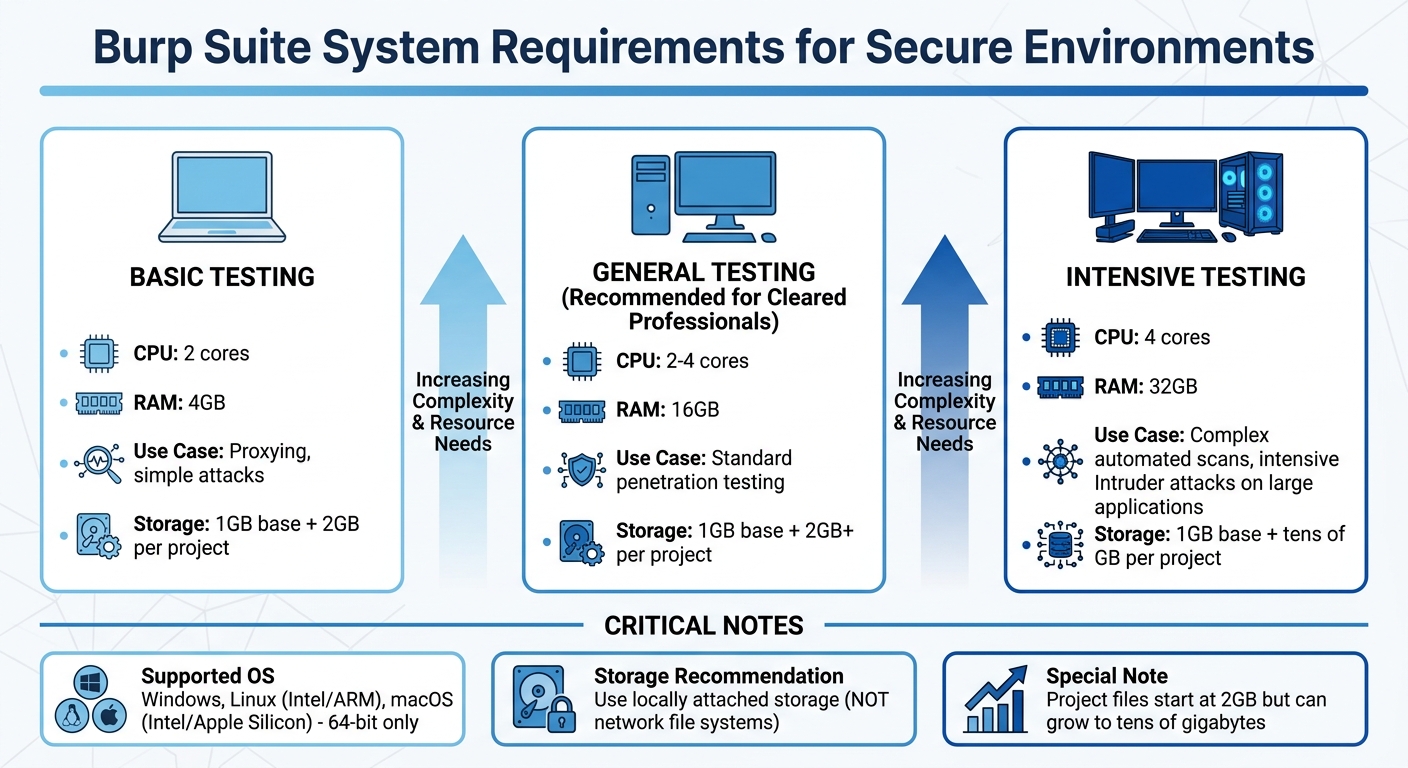
Burp Suite System Requirements by Testing Complexity
Getting the most out of Burp Suite’s advanced tools starts with a secure and carefully planned setup, especially in classified or high-security environments. Unlike a standard installation, deploying Burp Suite in such settings requires extra attention to air-gapped networks, strict access controls, and compliance with security protocols.
System Requirements and Installation
Your hardware setup plays a big role in how smoothly Burp Suite operates. For basic tasks like proxying or simple attacks, a system with 2 CPU cores and 4GB of RAM will work. However, for professionals working in cleared environments, 16GB of RAM is a better choice to ensure smooth performance during general testing. If you’re tackling more demanding tasks like complex automated scans or running intensive Intruder attacks on large applications, aim for 4 CPU cores and 32GB of RAM to avoid slowdowns [2].
Storage is another key consideration. While the base installation only needs 1GB of disk space, project files can quickly grow. Each project file starts at 2GB but can balloon to tens of gigabytes depending on the amount of proxy history and scan data [2]. For best results, use locally attached storage instead of network file systems. Network-based storage can significantly slow down performance during intensive scans [3].
Burp Suite supports 64-bit versions of Windows, Linux (Intel and ARM), and macOS (Intel and Apple Silicon) [2]. The installer includes its own Java Runtime Environment, which is a big plus in restricted environments where external software installations are limited [7]. On Linux, remember to make the installer executable using chmod +x before running it, especially in directories with restricted permissions [7]. If you’re using Ubuntu LTS (recommended), additional packages may be needed to support the embedded Chromium browser [3].
For SCIFs (Sensitive Compartmented Information Facilities) or air-gapped setups, manual activation is the way to go. Generate an activation challenge on the secure machine, transfer it to an internet-connected system, retrieve the response, and complete the activation offline [4].
Once installed, it’s time to configure Burp Suite for secure and compliant workflows.
Configuration for Security-Cleared Workflows
Start by ensuring the Proxy listener is bound to 127.0.0.1:8080 instead of "All interfaces." This prevents unauthorized access or triggering of security alerts by exposing your Burp instance to the network [6]. If you need to use a low port, configure OS-level port redirection [5].
For secure browsing, rely on Burp’s built-in Chromium browser. This browser comes pre-configured with the necessary proxy settings, offering better isolation than external browsers [6][8]. If you prefer an external browser, retrieve the CA certificate from http://burp, then import it into the browser’s trust store under "Authorities." Only select the option to "Trust this CA to identify websites" to maintain a least-privilege setup [6][7]. Browser extensions like FoxyProxy can simplify switching between proxy-enabled and regular browsing modes [6][7].
To stay compliant with clearance protocols, define your target boundaries from the start. Go to the "Target" tab and explicitly list the assets you’re authorized to test. This ensures that all tools, whether manual or automated, stay within those boundaries and avoid scanning unauthorized systems [7].
| Configuration Step | Default | Secure Workflow Recommendation |
|---|---|---|
| Proxy Listener | 127.0.0.1:8080 | Keep on 127.0.0.1; change port only if 8080 is in use |
| Browser Choice | External | Use Burp’s built-in Chromium for better isolation |
| CA Certificate | Not Installed | Install only in dedicated testing browser profiles |
| Target Scope | Empty | Define explicitly before any active scanning |
| Project Type | Temporary | Use "Project on disk" for data persistence and security |
Core Burp Suite Tools for Cleared Pen Testing
Once your secure setup is ready, Burp Suite’s core tools become essential for intercepting traffic, mapping applications, and fine-tuning requests. These tools are indispensable for web application testing in controlled environments, ensuring both compliance and precision throughout your workflow.
Proxy and Browser Integration
Burp Proxy acts as a middleman between your browser and the target application, listening on 127.0.0.1:8080 by default to keep testing traffic contained.
"Burp Proxy sits between your web browser and the target web application. This allows you to view all HTTP/HTTPS traffic passing between the two in real-time." – The CyberSec Guru [9]
The Intercept tab lets you pause requests before they reach the server, offering the ability to inspect and tweak headers, cookies, or parameters. This is particularly handy for bypassing client-side validation. Meanwhile, the HTTP History tab and Inspector panel allow you to make quick changes or analyze past requests without diving into raw text.
If certificate installation is restricted, Burp’s embedded browser comes in handy. For those using an external browser like Firefox in a secure lab, you can export the PortSwigger CA certificate from Burp and import it into the browser’s trust store to enable HTTPS interception.
It’s critical to define your target scope beforehand (as explained in the configuration section). This step filters out unnecessary traffic from operating system updates or browser extensions, ensuring you focus solely on authorized testing targets.
Once proxying is set up, you can turn your attention to mapping the application using Burp’s site mapping tools.
Building Site Maps and Performing Reconnaissance
The site map serves as a detailed blueprint of the target application, organizing data into a hierarchical structure of domains, directories, files, and parameterized requests. URLs you’ve visited appear in black, while inferred ones are grayed out. Icons with colored circles flag security concerns, helping you prioritize testing.
Start with a manual walkthrough using Burp’s browser to capture key functions like login processes and form submissions. If you have the Professional edition, you can enhance this with an automated crawl to uncover additional content.
For grayed-out items, you can right-click and choose "Request in browser" to manually explore potentially hidden features. The Find References feature helps you locate all HTTP responses linked to a specific element, making it easier to track dependencies and understand data flow.
The Target Analyzer provides a bird’s-eye view of application complexity, breaking down static and dynamic URLs and identifying how many parameters each URL accepts. For access control testing, you can map the application with a high-privilege account, then re-map it with a low-privilege session to uncover unauthorized access points.
Once you’ve mapped the site, you can use Repeater to dive into targeted testing and vulnerability validation.
Intercepting and Manipulating Traffic with Repeater
Burp Repeater allows you to move from passive observation to active testing by manually modifying and re-sending individual HTTP requests. You can send any request from the Proxy history or site map to Repeater by right-clicking and selecting "Send to Repeater."
Each request opens in its own tab, letting you test multiple vulnerabilities or endpoints at once. The interface splits into request and response panes, with each tab maintaining its own history for easy comparisons.
In April 2026, a security tutorial highlighted Burp Repeater’s potential when testing a simulated shopping site. By altering a
productIdparameter from an integer to a string, the tester triggered an error response revealing the server was running Apache Struts version 2.2.3.31 – a critical clue for further exploitation.
Hotkeys like Ctrl+R ("Issue Repeater request") can speed up your workflow. Extensions such as Hackvertor (for encoding), 403 Bypasser (for authorization testing), and Param Miner (for uncovering hidden parameters) further streamline testing. The newline (n) button is especially useful for spotting non-printable characters, which can indicate injection flaws. For cross-site scripting tests, enable "Auto-scroll to match when text changes" and use a unique string (e.g., test1337) to quickly locate payload reflections.
| Extension | Primary Use in Repeater |
|---|---|
| Hackvertor | Converts tags for various encodings (e.g., Base64). |
| Taborator | Embeds Burp Collaborator payloads into Repeater requests. |
| Param Miner | Discovers hidden parameters and headers. |
| 403 Bypasser | Tests request permutations to bypass authorization. |
| HTTP Request Smuggler | Configures and executes advanced request smuggling attacks. |
Advanced Techniques for Cleared Web App Testing
Once you’ve got the basics down, it’s time to level up. These advanced techniques help you push your testing capabilities further, especially in secure environments. With Burp Suite’s more sophisticated features, you can automate intricate attacks, perform precise scans in restricted setups, and even expand the tool’s functionality with specialized extensions.
Automating Attacks with Intruder
Burp Intruder lets you automate tailored attacks by re-sending a base HTTP request and injecting payloads into specific positions marked with § characters. It offers four attack modes – Sniper, Battering Ram, Pitchfork, and Cluster Bomb – each designed for different injection scenarios.
To spot vulnerabilities like blind SQL injection, monitor for changes in response length, status codes, and timing. Use the Grep – Match feature to flag strings such as "SQL syntax" or "Internal Server Error" for faster detection.
In secure environments, session persistence is key. Automated attacks can sometimes invalidate sessions after multiple failed attempts. To handle this, use Burp Suite Macros or the Stepper extension to keep session IDs and CSRF tokens updated automatically. Dedicated resource pools for Intruder attacks can also help manage concurrent requests and avoid overwhelming the target application.
If you’re using the Community Edition, curated wordlists are your best friend. Running attacks twice – once with URL encoding enabled and once without – can reveal how the server processes different input formats. For more complex scenarios, like race conditions or multi-step logic, Turbo Intruder offers Python-based scripting for enhanced control.
These automated methods work seamlessly with the scanning strategies discussed next.
Scanning for Vulnerabilities in Secure Environments
Burp Suite Professional provides scan presets designed to balance speed and depth:
- Lightweight: under 15 minutes
- Fast: under 1 hour
- Balanced: a few hours
- Deep: variable duration [11]
For sensitive environments, focus on targeted scans for specific HTTP messages or user-defined insertion points. This minimizes your footprint while concentrating on high-risk areas. Passive scans, which analyze unaltered requests and responses, are particularly effective for initial reconnaissance. To increase precision, manually highlight specific parts of a request (like custom headers or parameters) and select "Scan selected insertion point."
Save and export custom scan configurations to maintain consistent testing across different environments. Since version 2025.3, loading a scan configuration overwrites all current settings because every setting is treated as "edited" by default [11]. You can also create or import custom scan checks (BChecks) to identify vulnerabilities specific to your environment. For easy reference, store important requests and responses in Burp Organizer to avoid re-scanning.
Using Burp Suite Extensions
The BApp Store offers extensions that enhance Burp Suite’s capabilities. Here are some standouts:
- Turbo Intruder: Ideal for high-speed, high-volume attacks or complex logic that standard Intruder can’t handle. It uses a custom HTTP stack and Python-based configuration. As PortSwigger explains:
"Turbo Intruder is intended to complement Burp Intruder by handling attacks that require exceptional speed, duration, or complexity" [13].
Its flat memory usage makes it reliable for multi-day attacks in resource-limited environments.
- Param Miner: Automatically detects hidden, unlinked parameters using advanced diffing and binary search techniques. PortSwigger notes:
"Param Miner combines advanced diffing logic from Backslash Powered Scanner with a binary search technique to guess up to 65,000 param names per request" [14].
Enabling "auto-mining" on in-scope traffic can reveal concealed parameters during manual testing.
- Taborator: Simplifies out-of-band (OOB) testing by using the
$collabplzplaceholder in wordlists, which resolves to a valid Collaborator payload. - Burp Infiltrator: Patches Java or .NET bytecode to track when input reaches potentially unsafe server-side APIs. This provides detailed visibility into the call stack during scans. However, PortSwigger cautions:
"Burp Infiltrator should not be used on production systems… it makes non-reversible changes to application bytecode" [12].
| Extension | Primary Use Case | Integration Method |
|---|---|---|
| Turbo Intruder | Race conditions, massive fuzzing | Python scripting interface |
| Param Miner | Hidden parameter discovery | Right-click and select "Guess Hidden Parameters" |
| Hackvertor | Dynamic encoding/decoding | Tag-based input in request editor |
| Taborator | Out-of-band (OOB) testing | $collabplz placeholder in wordlists |
| Infiltrator | Server-side API monitoring | Bytecode patching (Java/.NET) |
When using Burp Infiltrator in secure setups, ensure both the target application and Burp Suite can connect with the designated Collaborator server. This may require specific firewall exceptions. Burp Suite Professional is available for $449 annually [10].
Reporting and Communicating Findings
Once you’ve completed your testing, the next step is to document and share your findings effectively. Burp Suite Professional makes this process straightforward by offering reporting options in HTML format for stakeholders and XML format for integration into GRC (Governance, Risk, and Compliance) systems [15]. The reporting wizard guides you through selecting issues, adjusting detail levels, and tailoring the output to suit different audiences [15][16].
Generating and Customizing Reports in Burp Suite
To generate a report, head to Target > Site map or Dashboard > All issues, then right-click to choose the issues you want to include. Use the Issues table to filter by severity (High, Medium, Low, Information) and confidence levels (Certain, Firm, Tentative) to ensure the report aligns with your organization’s risk framework [16][18]. This keeps the report focused and avoids unnecessary details.
For vulnerabilities you’ve identified manually, use the "Record an issue" option [17][18]. Include essential details like HTTP service data, paths, and at least two request/response pairs to demonstrate the vulnerability – one showing the injection and another showing the execution [17]. This approach provides solid evidence for auditors and technical teams.
If your organization uses specific reporting templates, export findings in XML format for easy integration into internal systems [15]. Each XML export includes a serialNumber element, which uniquely tags each issue, making it simple to track new and recurring findings across different engagements [19]. After generating an HTML report, preview it in Burp’s internal browser to ensure the layout and details meet your needs before sharing [16].
Best Practices for Communicating Results
Tailor your reports to fit the needs of your audience. For executives and program managers, create "Summary" reports that provide a high-level view of the security posture. For developers and system administrators, generate "Detailed" reports with full request/response data for remediation [19][21]. Summary reports typically include scan details, categorized issues by severity, and an overview of scanned URLs. In contrast, detailed reports dive deeper, offering technical evidence like HTTP requests and responses [21].
To align your findings with regulatory standards, use compliance-based reporting options such as OWASP Top 10: 2025 or PCI DSS v4.0.1 [19]. These formats help non-technical stakeholders grasp risks in a familiar framework. Each issue includes an "Advisory" section summarizing the vulnerability and offering remediation advice, which is critical for meeting regulatory requirements [18]. You can also filter the Issues table by source (e.g., BChecks, Scan checks, Extensions, or Manually generated) to organize findings for different sections of your report [18].
Before exporting, add internal notes using the Comment and Highlight features to flag critical items [18]. This ensures clarity during technical reviews and helps stakeholders focus on actionable information. For vulnerabilities that require more explanation, use Burp Comparer to display side-by-side comparisons of application responses. This visual proof makes it easier to demonstrate how inputs affect the system [20].
Conclusion
Recap of Core Skills and Techniques
To truly master Burp Suite, focus on a methodology-driven approach rather than relying solely on automation. The key skills outlined in this guide – traffic interception with Proxy, manual vulnerability testing with Repeater, and automated fuzzing with Intruder – serve as the backbone of professional penetration testing in secure environments. As security researcher CRUD5th-273- aptly put it:
"Burp Suite is only as powerful as your methodology. Precision over volume. Context over automation." [23]
For cleared professionals, identifying critical vulnerabilities like IDOR, XSS, and SQL injection is a must. Providing reproducible evidence through clear HTTP transcripts and comprehensive reports helps establish credibility as a professional tester. Techniques such as analyzing session tokens with over 10,000 samples at a 99% confidence level [22] or using dual browser profiles to uncover authorization flaws [1] demonstrate the level of rigor expected in classified environments. By mastering these tools and techniques, you contribute to safeguarding critical systems and infrastructure.
The next step? Building on these essential skills through deeper practice and expanding your toolkit.
Next Steps for Cleared Professionals
To further develop your expertise, practice regularly on PortSwigger Academy, which offers free labs designed by the creators of Burp Suite [1][24]. Pair this with hands-on work using intentionally vulnerable applications like OWASP Juice Shop and Damn Vulnerable Web Application (DVWA) to sharpen your exploitation abilities [1][24]. Explore the BApp Store for extensions like Logger++, Turbo Intruder, and AuthMatrix to enhance your testing capabilities [24].
While mastering Burp Suite is essential, it’s only one piece of a broader security toolkit. Complement your Burp skills with tools like Wireshark, Metasploit, and Nmap to further boost your career potential [22]. Consider exploring roles in secure government or defense settings that value Burp Suite expertise.
FAQs
How do I activate Burp Suite offline in an air-gapped lab?
To activate Burp Suite offline in an air-gapped lab, start by generating a license request on the offline machine. Transfer this request securely to an online machine where you can obtain the activation response. Once you have the response, bring it back to the offline machine and import it into Burp Suite. Alternatively, secure workflows like using QR codes or encrypted license files can simplify the process while maintaining security in an isolated environment.
What’s the safest way to intercept HTTPS traffic in a SCIF?
To safely intercept HTTPS traffic within a SCIF, Burp Suite’s proxy features are an effective tool when combined with strict security practices. Use Burp Proxy as a man-in-the-middle (MITM) by installing its CA certificate on authorized devices only. This setup should be implemented in a controlled, isolated environment to prevent any unintended exposure. It’s critical to never share the certificate outside of this environment. Always adhere to your organization’s security protocols to protect confidentiality and maintain data integrity during testing.
How can I keep sessions and CSRF tokens valid during Intruder attacks?
To keep sessions valid and manage CSRF tokens during Intruder attacks, you need to configure Burp Suite’s session handling rules carefully. Set these rules to automatically refresh cookies and update anti-CSRF tokens with every request. This prevents session invalidation and ensures tokens don’t expire, allowing the session to remain active throughout your testing process. Proper setup is key to maintaining uninterrupted testing without manual intervention.
Related Blog Posts
Rapid7 InsightVM for Cleared Vulnerability Analysts Skills Guide
Rapid7 InsightVM is a vulnerability management platform tailored for government and defense environments. It helps cleared analysts identify risks, prioritize vulnerabilities, and maintain compliance with federal security standards. Key features include:
- Active Risk Scoring: A 0–1,000 scale that factors in real-time threat intelligence, exploitability, and attacker behavior.
- Policy Manager: Ensures compliance with benchmarks like USGCB and FDCC, with options for rule overrides and audit trails.
- Authenticated Scans: Provides deeper visibility into systems but requires more storage and setup.
- Remediation Projects: Tracks vulnerability fixes with clear statuses and integrates with tools like Jira or ServiceNow.
- Reverse Communication: Allows Scan Engines to contact the Security Console in restricted environments.
To optimize performance, use distributed Scan Engines, adjust scan templates, and enable FIPS mode for compliance. This guide covers essential skills like setting up scans, managing credentials, and prioritizing vulnerabilities effectively.
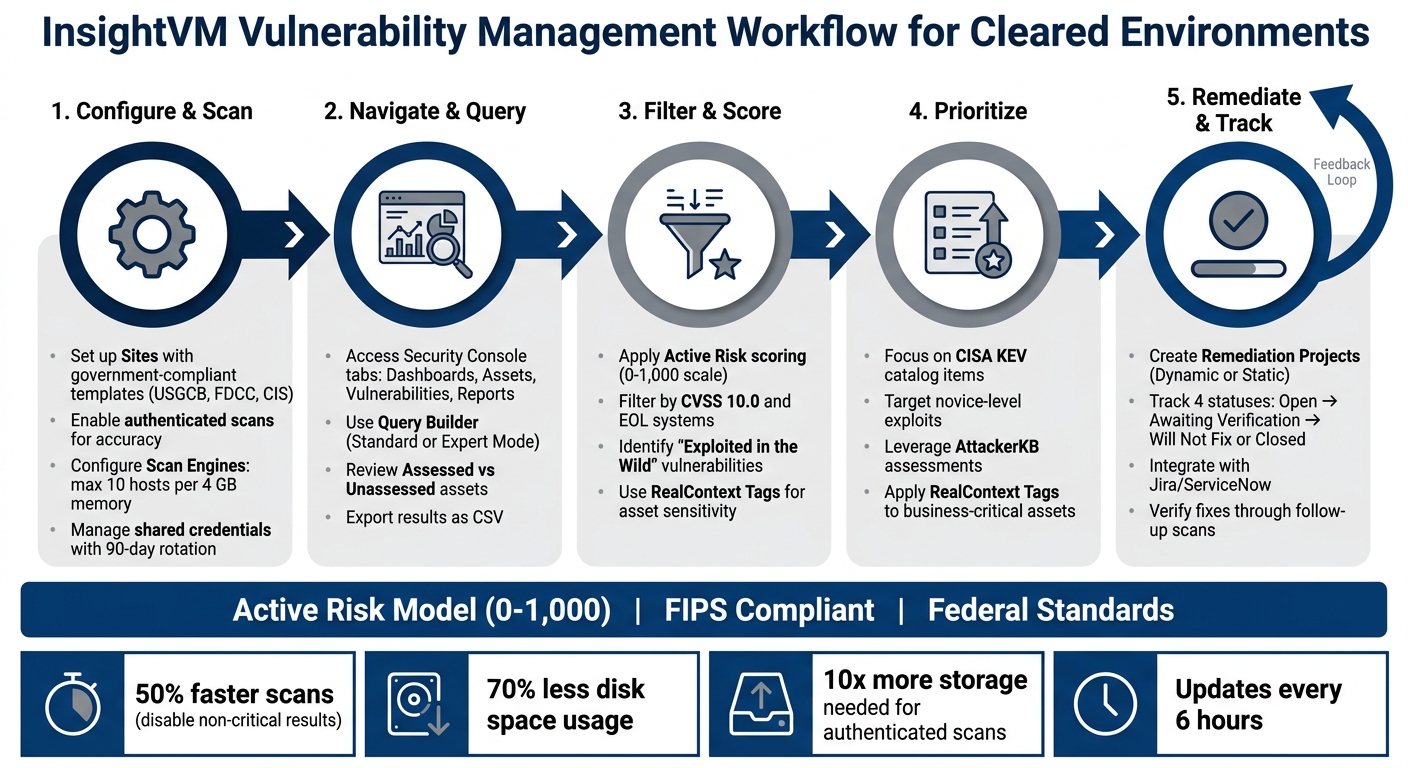
InsightVM Vulnerability Management Workflow for Cleared Environments
How to Navigate the InsightVM Security Console and Vulnerability Database
Understanding the Console Layout
The Security Console is organized with a navigation menu featuring tabs for Dashboards, Assets, Vulnerabilities, and Reports [8]. In the upper-right corner, you’ll find the Query Builder (magnifying glass icon), a tool designed to let you quickly switch between data on assets, vulnerabilities, services, and software using custom queries [9].
The console categorizes assets into two groups: Assessed (those scanned or with an installed agent) and Unassessed (discovered dynamically through systems like LDAP or AWS but awaiting scans) [5]. This distinction makes it easier to stay compliant in environments requiring strict oversight. By default, sessions time out after 10 minutes (600 seconds) [6]. If you’re working on detailed analysis, consider extending this to 30 or 60 minutes to avoid interruptions.
Dashboards are customizable, featuring a drag-and-drop interface with pre-built widgets for real-time monitoring. You can start with Rapid7 templates or design your own dashboards, which can be exported as PDFs. Similarly, Query Builder results can be exported as CSV files. Keep in mind, though, that dates in these CSV files are in epoch format, so you’ll need to apply conversion formulas to make them readable [8].
This intuitive layout ensures you can efficiently access and analyze the vulnerability data you need.
How to Access and Use the Vulnerability Database
The vulnerability database is accessible through the Vulnerabilities tab or the Query Builder tool in the Security Console [3]. It combines research from Nexpose with exploit data from Metasploit, making it a comprehensive resource [4]. Look for these icons to understand vulnerability details:
- Malware icon: Indicates vulnerabilities tied to known malware or exploit kits.
- Metasploit icon: Shows that a corresponding Metasploit module is available.
- Exploit DB icon: Confirms the presence of an exploit in the public Exploit Database [4].
The Query Builder enhances your search capabilities with two modes:
- Standard Mode: Use menu "pills" to define search criteria.
- Expert Mode: Use advanced filters with AND/OR operators (&&, ||) and parentheses for more complex queries [9].
You can also use keyboard shortcuts like Tab, Shift + Tab, and Enter to speed up your workflow [9]. In the Solutions column, a single "pill" represents the best remediation option, while multiple pills indicate the need for further evaluation to determine the most effective solution [4].
This combination of tools and features ensures you can navigate and utilize the database with precision and efficiency.
sbb-itb-bf7aa6b
How to Configure Scans and Manage Shared Credentials
Setting Up Scans in InsightVM
InsightVM organizes scans around Sites and Scan Templates. To get started, create a Site to define the assets you want to scan and apply a government-compliant Scan Template, such as USGCB, FDCC, or CIS benchmarks. These templates are designed to meet federal security standards by including policy checks that align with those requirements [10].
For environments that demand high accuracy, authenticated scans are essential. These scans allow for local checks – like accessing the Windows Registry or package managers – which significantly reduce false positives [11][14]. To improve accuracy further, enable the Reliable Check Correlation setting when using credentials. This ensures the system prioritizes operating system patch checks over less reliable remote methods [14]. Keep in mind, though, that authenticated scans require up to 10 times more disk space than unauthenticated ones [12].
To streamline operations, schedule scans to run automatically. If you need to perform Unsafe checks, limit these to maintenance windows to minimize risks [12][14]. For optimal performance, configure the Scan Engine to scan no more than 10 hosts per 4 GB of memory [13]. If credentials are causing issues, enable the Scan Diagnostics check category to identify problems like SSH privilege elevation errors or difficulties accessing the Windows Registry [11].
Once your scans are set up, the next step is to secure your authentication process by managing shared credentials properly.
Managing Shared Credentials Securely
Shared credentials are a centralized way to manage authentication while adhering to policies like 90-day password rotation [15]. To maintain security, only Global Administrators or users with Manage Site permissions should be allowed to create or edit these credentials, ensuring access is limited to those who truly need it [15].
For added control, restrict credentials to specific IP addresses, CIDR ranges, hostnames, or ports. This prevents the Scan Engine from attempting authentication on unauthorized or irrelevant assets [15]. You can also use the Exclude IP Address field to ensure sensitive or trusted assets within a broader scan range are not scanned [15]. Before deploying credentials across an entire site, test them on a single asset to avoid issues like account lockouts or failed scans [15][17].
After running a scan, review the Authentication column to confirm proper credential use. A Fingerprint Certainty score of 1.0 (100%) indicates full access, while a score of 0.85 (85%) suggests limited access, such as GUEST-level permissions [16]. For compliance with standards like CIS or DISA STIG, make sure to use administrative or root-level credentials [16].
How to Filter, Score, and Assess Vulnerabilities
Using Filters to Identify Critical Vulnerabilities
The Query Builder in the console takes vulnerability investigation to the next level by allowing you to apply targeted filters. Whether you’re in Standard or Expert Mode, these filters help refine your search significantly. Results can also be exported as a CSV file for easier reporting. For those using Expert Mode, you can create more complex queries with logical operators. For instance, you might use a condition like !(asset.software.version = 'foo') to exclude specific software versions from your results [19].
Start by narrowing down vulnerabilities that require minimal technical expertise to exploit. Use the "Exploitable Vulnerabilities by Skill Level" filter and focus on vulnerabilities with a CVSS score of 10.0, which often indicates risks related to end-of-life (EOL) systems. The Site Summary scatter plot is another useful tool, helping you spot outlier assets that demand immediate attention [5]. To further refine your results, you can filter for Validated Vulnerabilities, which are confirmed through Metasploit integration. This ensures your remediation efforts are directed toward verified risks [18]. Additionally, applying RealContext Tags like "Very High" can help you prioritize assets that are critical to your operations.
Once you’ve filtered the vulnerabilities, you can move on to evaluating them using the Active Risk model for a quantitative assessment.
Understanding CVSS Scoring and Risk Models
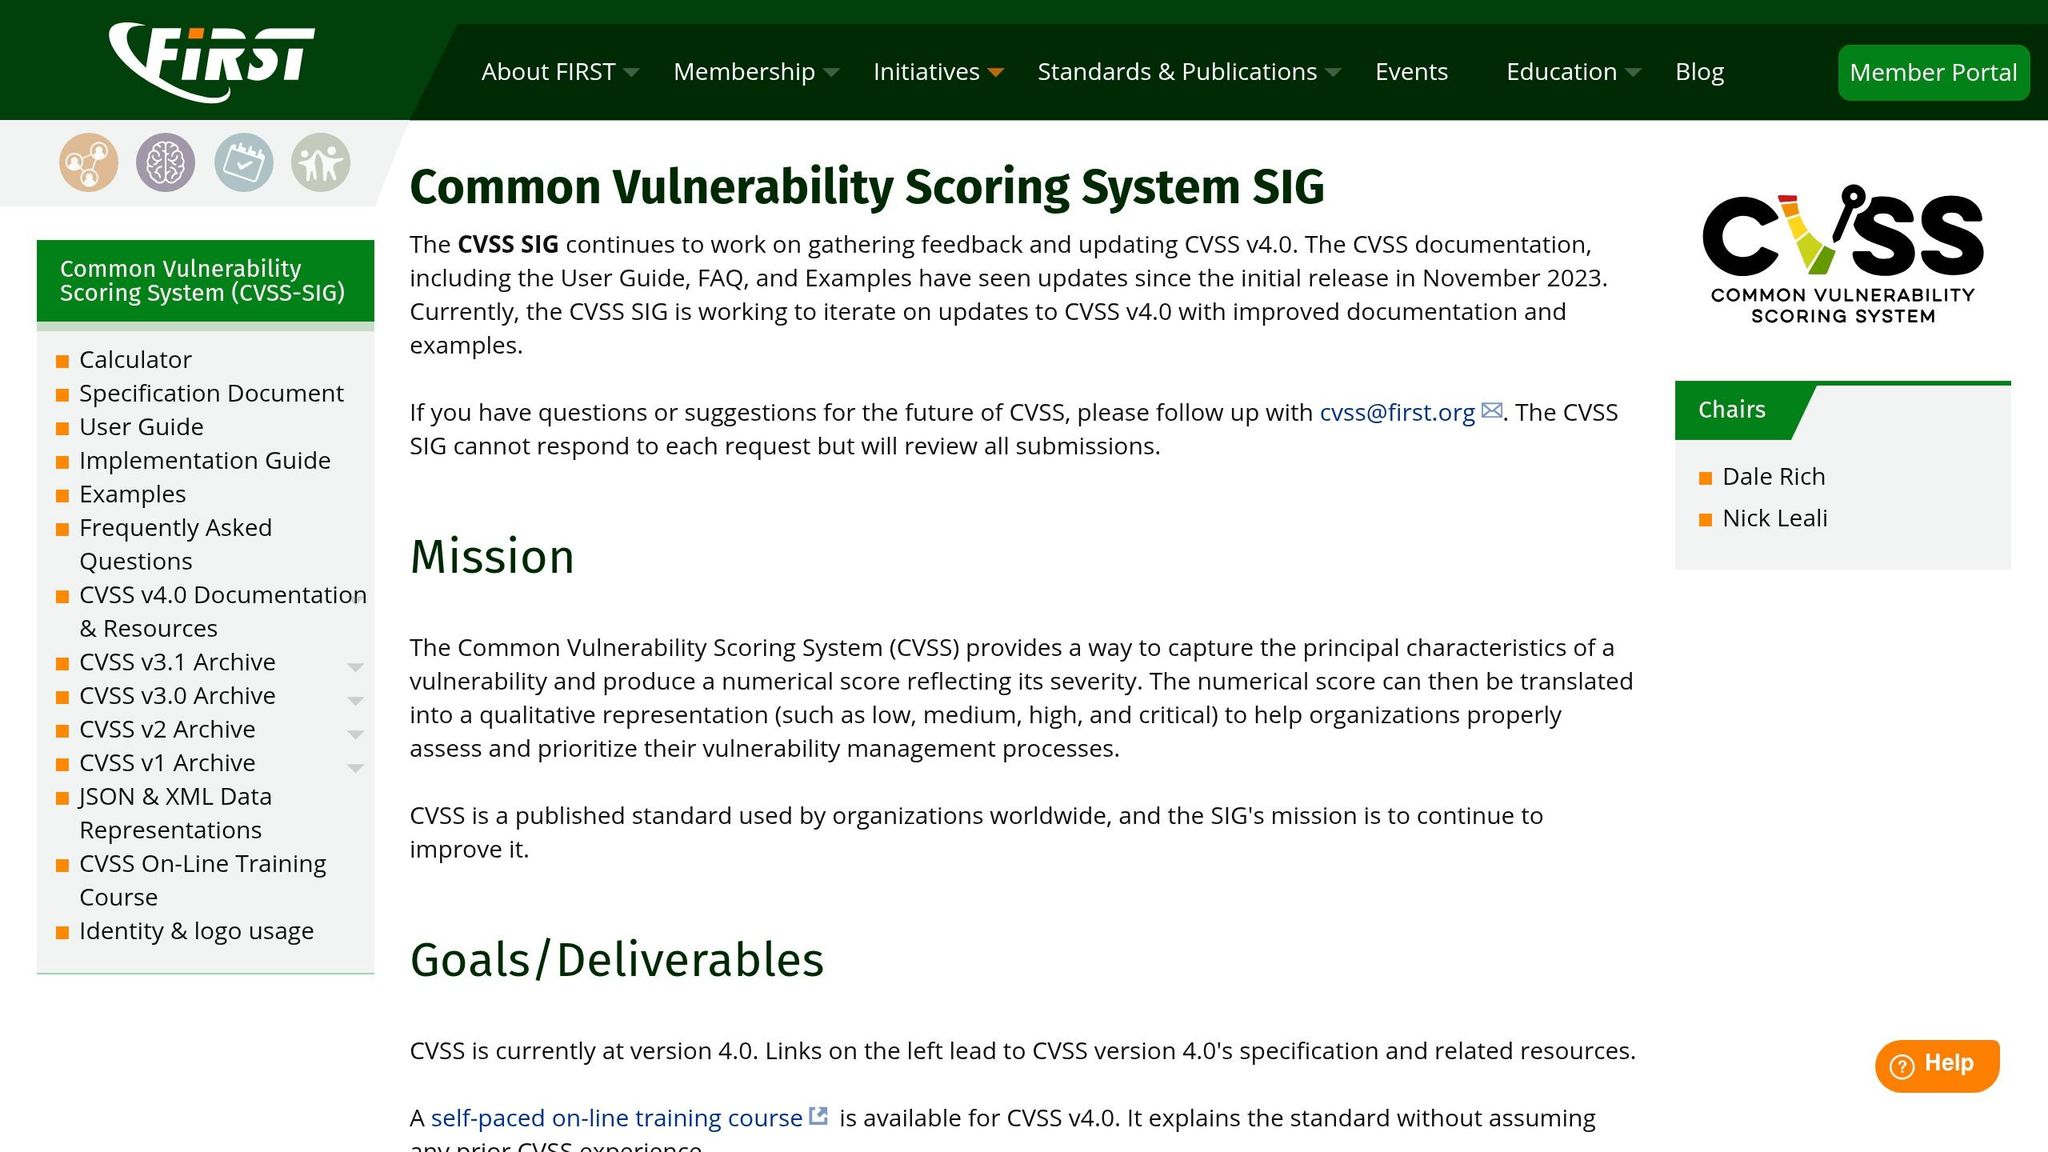
As of January 21, 2026, the Active Risk model is the only supported scoring strategy, replacing older models like RealRisk and Temporal [1]. Active Risk uses a 0–1,000 scale to score vulnerabilities, combining the base CVSS score with factors like exploitability, threat intelligence, and an "Exploited in the Wild" indicator. Vulnerability definitions are updated every six hours to ensure the latest patch data is included [1][4].
In June 2024, an updated correlation algorithm was introduced, which now identifies vulnerabilities on individual network interface cards (NICs). This enhancement can increase the total vulnerability count by 10% or more in complex environments [5]. When prioritizing remediation efforts, sort vulnerabilities by their Active Risk score. Pay special attention to vulnerabilities flagged as "Exploited in the Wild" or those classified as novice-level exploits [1][4]. These scoring insights enable analysts to align their prioritization with federal security standards effectively.
How to Prioritize and Remediate Vulnerabilities in Cleared Environments
How to Prioritize Vulnerabilities
Start by focusing on vulnerabilities flagged as "Exploited in the Wild" using resources like CISA’s KEV catalog and Rapid7 threat research [1]. These vulnerabilities are automatically given higher weight in the Active Risk model, which scores issues on a 0–1,000 scale, making them easier to identify and prioritize.
Next, fine-tune your prioritization by applying RealContext Tags to your assets. These tags account for the business sensitivity of each asset, ensuring that risk scores reflect the real-world impact on your cleared operations rather than just the technical severity of the vulnerability [1].
Pay special attention to End-of-Life (EOL) systems, which are common in cleared environments where air-gapped systems may still rely on outdated software. Also, prioritize vulnerabilities classified as "Novice" skill level for exploitation, as they can be targeted by a wider range of attackers [4].
Leverage the AttackerKB assessment within the Active Risk model to evaluate the exploitation potential of each vulnerability [1]. This approach shifts focus from theoretical CVSS scores to the vulnerabilities that attackers are most likely to exploit.
Remediation Workflows in InsightVM
After prioritizing vulnerabilities, structured remediation becomes essential. Use Remediation Projects to coordinate efforts between security and IT teams. You can choose between two types of projects:
- Dynamic Projects: Automatically add new vulnerabilities as they are discovered within a defined scope. These are ideal for ongoing maintenance in cleared environments.
- Static Projects: Lock the asset and solution membership at the time of creation, making them better suited for one-time audits or specific remediation sprints [20].
When creating a project, use the Query Builder to define your scope precisely. For instance, you could set up a dynamic project to include all "Critical" vulnerabilities on assets tagged as "Production" within your cleared network [20]. Assign team members, set deadlines, and integrate with tools like Jira or ServiceNow for automated ticket creation, where permitted. In environments where integrations aren’t allowed, use the "Remediator Export" feature to generate a CSV file for offline distribution [20].
Monitor progress using four remediation statuses:
- Open: Vulnerable, no action taken.
- Awaiting Verification: Solution applied but awaiting confirmation through a scan.
- Will Not Fix: Risk accepted due to operational constraints.
- Closed: Vulnerability verified as fixed [20].
The "Awaiting Verification" status is particularly important in cleared environments to ensure high-assurance remediation. A follow-up scan must confirm the vulnerability is resolved before marking it as "Closed" [20].
"Accountability is the number one reason I recommend using Remediation Projects over the Top Remediation or SQL Query Export reports. With Remediation Projects, you can track whenever a solution is resolved, and the number cannot be manually manipulated." – Landon Dalke, Author, Rapid7 [22]
For vulnerabilities that cannot be addressed due to mission-critical constraints, use the "Will Not Fix" status. This recalculates the project’s risk score to reflect accepted risks and keeps an audit trail for compliance purposes [20]. Note that only Global Administrators can create dynamic projects, while Security Managers, Site Owners, and Asset Owners can create static projects for their authorized assets [20].
Best Practices for Using InsightVM in Cleared Cybersecurity Operations
Maintaining Compliance with Security Policies
To meet federal cryptographic standards, start by enabling FIPS mode on your Security Console. This step is essential for cleared environments where encryption and hashing must align with FIPS-compliant algorithms [7].
Leverage the Policy Manager feature to conduct configuration assessment audits against standards like USGCB (2.0 and 1.0), FDCC, and CIS benchmarks [10][24]. Since built-in policies can’t be modified directly, make copies to create customized versions tailored to your organization’s hardening requirements [25][26]. This approach allows you to adjust overly strict rules without losing compliance tracking.
Keep your private keys secure by monitoring the nsc.ks and nscweb.ks keystore files with File Integrity Monitoring (FIM). Additionally, encrypt the underlying filesystem using LUKS for Linux or BitLocker for Windows [23]. Document the creds.kspw file, which stores the keystore encryption key, separately since it’s excluded from standard backups [23].
Replace the default self-signed HTTPS certificate with one issued by an internal Certificate Authority (CA). This improves trust for administrative traffic and resolves login issues on the platform [23][6]. Finally, align your data retention policies with audit requirements: keep scan data for 12 months (for PCI compliance) and asset/agent data for 30 days to automatically clean up inactive devices [23][6].
Here’s a quick overview of recommended retention settings:
| Data Type | Recommended Retention | Purpose |
|---|---|---|
| Scan Data | 12 Months | Legal and audit requirements (e.g., PCI) [23] |
| Asset Data | 30 Days | Removes decommissioned or inactive devices [23] |
| Agent Data | 30 Days | Matches Insight Platform’s default policy [23] |
| Report Data | 6 Months | Clears large historical files to free storage [23] |
Optimizing InsightVM for Cleared Operations
Once compliance protocols are in place, shift your focus to optimizing InsightVM for better performance and scalability.
For environments with over 1,000 assets, prioritize distributed Scan Engines instead of relying solely on the local engine. This prevents resource bottlenecks and ensures the Security Console operates efficiently [23][6]. Place Scan Engines on the same side of the firewall as the assets being scanned to avoid delays caused by perimeter firewalls.
Organize sites by broad geographical regions or functional areas (e.g., "US-East" or "All Corporate") rather than by small IP ranges. This reduces administrative complexity and improves scalability [23]. Use Static Asset Groups and Tags instead of Dynamic Asset Groups (DAGs), as the latter requires resource-intensive database calculations after every scan [23][6].
To speed up scans, disable the "Store non-critical results" option in scan templates. This can cut scan times by about 50% and reduce disk space usage by 70% [6]. Also, turn off "Nmap Services Detection" and "UDP packet sending" if you’re relying on credentials or agents, as these settings can significantly reduce scan durations without sacrificing key data [6].
Adjust product update frequency from the default 6 hours to 24 hours, scheduling updates outside of standard work hours to avoid mid-day disruptions [23][6]. Extend the session timeout from the default 10 minutes to 30 or 60 minutes to minimize frequent re-logins [23][6]. If you increase the Security Console’s RAM after installation, don’t forget to manually run the tune assistant command to optimize PostgreSQL performance for the updated memory allocation [6].
For VPN or bandwidth-constrained networks, deploy Insight Agents to gather authenticated results without transmitting shared credentials [23]. Ensure scan credentials have root or administrator-level permissions for a thorough security assessment of each asset [23]. Lastly, account for the increased disk space requirements of authenticated scans during storage planning [7].
Conclusion and Key Takeaways
Summary of Skills and Practices
Getting the most out of InsightVM calls for a well-thought-out approach to vulnerability management, especially in cleared environments. This guide has walked you through essential practices, like navigating the Security Console, setting up authenticated scans with shared credentials, and adopting the Active Risk strategy. This scoring system (ranging from 0 to 1,000) replaced all older risk models on January 21, 2026. By incorporating live threat intelligence from sources like CISA KEV, AttackerKB, and Metasploit, it prioritizes vulnerabilities based on actual exploit activity rather than theoretical severity [1].
You’ve also learned how to boost efficiency with practical tips. For instance, disabling the "Store non-critical results" option can cut scan times by 50% and reduce disk space usage by 70% [6]. For cleared operations, enabling FIPS mode ensures cryptographic compliance, while the Policy Manager helps audit systems against benchmarks like USGCB or FDCC to stay aligned with regulations [2][3].
This guide’s detailed instructions – from navigating the console to managing remediation workflows – equip you to implement these techniques right away. The strategies covered earlier, such as organizing assets effectively and automating data retention policies, lay the groundwork for scalable and efficient vulnerability management. By building on these practices, you can enhance your operational success.
Next Steps for Cleared Professionals
Now that you’ve mastered the basics, it’s time to take the next steps with InsightVM. Start by fully transitioning to the Active Risk model if you haven’t already. Keep in mind that all legacy models, including RealRisk, Temporal, TemporalPlus, Weighted, and PCI ASV 2.0, were officially phased out on January 21, 2026 [1]. This transition ensures that your prioritization strategies are backed by real-time threat intelligence.
Deepen your platform expertise by mastering the Query Builder to create dashboards for high-priority assets [29]. Use Quick Actions for instant lookups of IPs, domains, or file hashes through services like WHOIS, DNS, or VirusTotal [21]. Streamline your remediation efforts by integrating automated ticketing workflows with tools like Jira or ServiceNow.
Focus on authenticated scanning – it’s your best option for collecting detailed data, including file system and registry insights, which are critical for verifying compliance in secure environments [27][28]. As your confidence grows, explore advanced features like container security assessments and creating custom vulnerability checks (.vck files) tailored to proprietary software in your cleared environment [28]. These skills will help you manage vulnerabilities effectively at any scale while upholding the stringent security standards required in cleared cybersecurity operations.
Rapid7 InsightVM –Vulnerability Analysis, Reporting & Dynamic Assets Filtering – Lab Demo 6 by Jovo
FAQs
How do I choose what to fix first using Active Risk?
To effectively prioritize vulnerabilities in Rapid7 InsightVM, start by sorting them based on their risk score. This score blends CVSS data with real-time threat intelligence, giving you a clear picture of which vulnerabilities are the most dangerous. Focus your efforts on those with the highest risk scores first, as they likely represent the most pressing issues to address in your system.
What’s the safest way to run authenticated scans in a cleared network?
The best approach to running authenticated scans in a cleared network is to use methods that safeguard sensitive credentials. Rapid7 InsightVM suggests using the Scan Assistant, which ensures encrypted communication through ECDSA and AES between the Scan Engine and your assets. This eliminates the hassle of directly managing credentials. Alternatively, you can use securely configured, limited-scope credentials to improve scan accuracy while keeping security intact. Always handle credentials with care and enable authentication only when absolutely necessary.
How can I prove a vulnerability is really fixed in InsightVM?
To ensure a vulnerability has been resolved in InsightVM, start by re-running the original scan. Check the results to verify that the issue no longer appears.
For an extra layer of confirmation, you can use the Rapid7 AppSec Plugin for Chrome to replay the attack. This helps confirm that the attack traffic is no longer present.
If the scan results no longer detect the vulnerability after remediation, you can be confident that the fix was successful.
Related Blog Posts
Qualys for Cleared Vulnerability Management Skills Guide
Qualys is a powerful tool designed for managing vulnerabilities in highly secure environments. It helps cleared professionals identify, assess, and address system weaknesses while meeting strict federal compliance standards like FISMA, FedRAMP, and CISA directives. The platform simplifies tasks such as internal scanning, asset visibility, and remediation, ensuring sensitive systems remain secure.
Key Takeaways:
- Compliance: Supports FedRAMP High, FISMA, and CISA requirements.
- Asset Management: Provides 100% visibility across on-premises, cloud, and air-gapped networks.
- Vulnerability Prioritization: Uses TruRisk scoring to focus on the most critical threats.
- Automated Workflows: Streamlines patching, reporting, and remediation processes.
- Customizable Tools: Offers dynamic tagging, dashboards, and policy compliance checks.
Whether you’re securing classified networks or managing vulnerabilities in restricted environments, Qualys provides the tools to stay ahead of threats and meet compliance needs.
Practical Vulnerability Management using Qualys | Free Course for Security Analyst and GRC Analyst
sbb-itb-bf7aa6b
Getting Started with Qualys VMDR
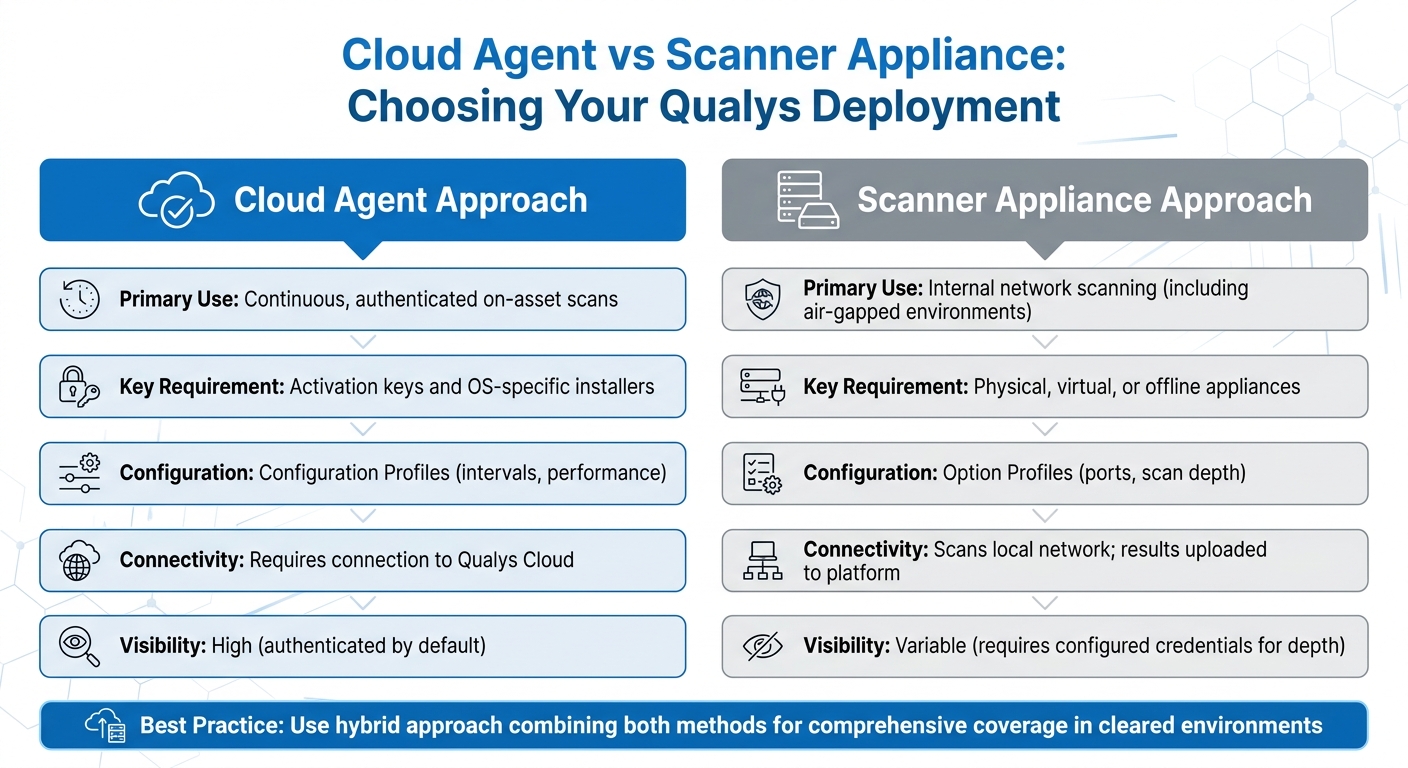
Qualys Cloud Agent vs Scanner Appliance Deployment Comparison
Setting Up Qualys in Cleared Environments
When you first log in to Qualys, make sure to immediately change the default password. Then, configure password settings – like expiration periods, failed login limits, and reset limits – under Users > Setup > Security to match your organization’s policies [4]. For security, users can reset their password only three times within an hour [4]. It’s also a good idea to add at least one extra user with a Manager or Unit Manager role. This ensures you avoid account lockouts and maintain access even if the primary account is compromised [4].
Next, decide on your deployment approach: Cloud Agents, Scanner Appliances, or a combination of both. Cloud Agents are great for ongoing, authenticated scans directly on assets. They require activation keys and OS-specific installers to set up. On the other hand, Scanner Appliances are particularly useful for scanning internal networks, especially in air-gapped environments. For high-security settings, cleared professionals can use physical, virtual, or offline scanner appliances to meet strict operational demands [10].
| Setup Component | Cloud Agent Approach | Scanner Appliance Approach |
|---|---|---|
| Primary Use | Continuous, authenticated on-asset scans | Internal network scanning (including air-gapped environments) |
| Key Requirement | Activation keys and OS-specific installers | Physical, virtual, or offline appliances |
| Configuration | Configuration Profiles (intervals, performance) | Option Profiles (ports, scan depth) |
| Connectivity | Requires connection to Qualys Cloud | Scans local network; results uploaded to platform |
| Visibility | High (authenticated by default) | Variable (requires configured credentials for depth) |
For more complex cleared environments, use Custom Networks to handle overlapping IP ranges effectively [6]. You can add assets by IP address or discover them using the "Maps" feature. To protect sensitive or mission-critical systems, set up an Excluded Hosts list. This ensures these systems are never scanned, even if they’re accidentally included in a scan target [7].
Although not mandatory, authenticated scanning is strongly recommended in cleared environments. By configuring authentication records, you allow the system to log in to target assets, providing deeper insights compared to unauthenticated scans [10]. To enhance efficiency, establish remediation policy rules. These rules automate ticket creation, specify which vulnerabilities or hosts should trigger actions, assign tasks to either the Asset Owner or the User Running the Scan, and set deadlines for resolution [11].
These steps lay the groundwork for using VMDR’s integrated tools, which simplify vulnerability management and improve security.
Qualys VMDR Core Features
Once your setup is complete, you can take advantage of the full range of Qualys VMDR’s capabilities. Tailored for cleared environments, VMDR combines asset discovery, vulnerability assessment, threat prioritization, and remediation – all in real time [4][9]. With over 200 searchable attributes, you can locate specific systems across large networks in seconds [12].
Dynamic asset tagging is a standout feature. It automatically organizes assets based on their attributes, making reporting and policy management much easier [6]. For targeted scans, you can create Search Lists to focus on specific vulnerabilities (QIDs). This is especially helpful when you don’t need a full scan or when compliance audits require a narrow scope [10][11]. By doing this, you can reduce your network footprint while prioritizing critical threats.
Another powerful tool is the Isolation Jobs feature, which helps you manage assets with unresolved vulnerabilities. With the "Isolate Now" option, you can quarantine an asset or limit its communication. While isolated, the asset’s Qualys Detection Score (QDS) drops to zero until the issue is permanently resolved [8]. You can also assign up to 200 co-authors to a single isolation job and set up quarantine notifications for as many as ten email recipients [8].
For compliance purposes, you can import CIS-certified policies or SCAP policies from the Qualys library to ensure systems meet regulatory standards [5]. To avoid disruptions during critical operations, configure blackout windows in Cloud Agent profiles [7]. Additionally, enable syslog forwarding from scanner appliances to a remote server to maintain centralized audit trails, which are often required in cleared environments [7].
Data retention is another key consideration. Enterprise and Consultant plans offer a default retention period of 6 months, with a maximum of 13 months. For Community Edition users, retention defaults to 3 months and maxes out at 6 months [7]. POC Managers can enforce consistent retention settings across the subscription using the Storage Setup dialog’s "Apply settings to all users" option [7].
Using Qualys Tools for Vulnerability Assessment
Dashboards, Widgets, and Search Capabilities
Qualys Unified Dashboards bring together data from all Qualys applications, offering a comprehensive view of your security environment [14][18]. In sensitive or restricted environments, you can use asset tags to limit dashboard access, ensuring proper compartmentalization [14].
Custom widgets can be created using Qualys Query Language (QQL) to focus on specific asset attributes, such as assetId or last location, or vulnerability details like severity and detection age [13]. For example, a QQL query like criticalityScore>=4 OR riskScore>=700 helps pinpoint your most critical systems [17]. Venn widgets are particularly helpful for visualizing overlaps, such as identifying "High Value" assets that also have "High Risk" vulnerabilities, enabling faster prioritization [17].
By default, dashboards can accommodate up to 80 widgets, though this limit can be adjusted with support from Qualys [15]. Historical data is retained for 90 days, allowing you to analyze trends in vulnerability counts over time [18][19]. To streamline workflows, the "Keep Selection Persistent" feature lets you save tag filters at either the subscription or user level [16]. You can even export dashboard configurations in JSON format for consistent application across different environments or subscriptions [15][19].
These tools provide a strong foundation for understanding how Qualys evaluates and prioritizes vulnerabilities.
Understanding Qualys Severity Levels and Reports
Qualys employs three scoring systems to assess vulnerabilities: QVSS (0–10 scale) for visual insights, QDS (1–100 scale) for automation, and TruRisk (0–1,000 scale) for asset-focused risk analysis [20][22][23]. Unlike CVSS, which focuses solely on technical severity, QVSS and QDS also consider external factors like active exploitation and malware links. For instance, CVE-2024-50302 may have a "Medium" CVSS score of 5.5, but Qualys assigns it a "Critical" QVSS score of 9.5 due to its association with weaponized exploits and active malware [20][22].
"A vulnerability with a low CVSS score can still have a high QDS because attackers often exploit overlooked vulnerabilities to evade detection." – Qualys Documentation [22]
When prioritizing remediation, focus on vulnerabilities with QVSS scores between 9.0–10.0 or QDS scores of 90–100, as these often indicate active exploitation [20][22]. The VMDR Prioritization Report is a useful tool for identifying critical vulnerabilities by correlating factors like detection age, Real-Time Threat Indicators (RTIs), and the attack surface [21]. You can also use QQL to uncover hidden risks. For example, a query like vulnerabilities.vulnerability.cvss3Info.baseScore<4.0 and vulnerabilities.detectionScore>79 reveals vulnerabilities with low CVSS scores but high detection scores [22].
In sensitive environments, you can refine scores further with Environmental Adjustments, which take into account whether assets are internet-facing, critical systems, or protected by controls like EDR or network segmentation [20]. Assigning criticality levels (1–5) to assets through tags allows the TruRisk engine to weigh overall risk based on the highest criticality score [23].
These scoring systems, combined with real-time intelligence, enhance your ability to prioritize risks effectively.
Integrating Threat Intelligence for Risk Prioritization
Qualys tracks over 300,000 CVEs using data from more than 25 threat intelligence sources [22]. This approach shifts the focus from technical severity to real-world risk by incorporating external intelligence, exploit maturity, and attacker activity [22][25]. Real-Time Threat Indicators (RTIs) like "Zero-day", "Active Attack", "Ransomware", and "Wormable" help you respond quickly to high-risk vulnerabilities [22].
Qualys assigns scores to vulnerabilities even before they appear in the National Vulnerability Database (NVD), relying on vendor advisories and internal research to prevent delays in remediation [22]. For CVEs not yet listed in the NVD, Qualys uses a weighted scoring model – 20% from available CVSS data and 80% from RTI analysis [22]. If a CVE is linked to the CISA KEV catalog or a known threat actor, it receives a weight of over 90% in the scoring system [22].
"QVSS elevates the score because attackers are already exploiting it, creating significantly higher real-world risk than CVSS indicates." – Qualys Documentation [20]
To stay ahead of emerging threats, monitor widgets like "Top 20 Trending CVEs in the Wild" and "Latest 20 CVEs with Weaponized Exploits" [24]. Qualys recommends addressing vulnerabilities with a TruRisk-QDS score of 70 or higher [22]. The QDS consolidates multiple CVEs into a single actionable score for a Qualys ID (QID), ensuring that critical vulnerabilities are not overlooked [22]. This method helps identify vulnerabilities that may have low CVSS scores but pose high risks due to active exploitation [22].
Remediation and Compliance with Qualys
Qualys provides tools that simplify vulnerability management by combining automated workflows with integrated asset management. This approach is crucial for maintaining operational authorization in high-security environments.
Patch Management Workflows
Qualys makes patching straightforward with its "Patch Now" feature in the VMDR Prioritization report. This tool identifies and deploys necessary patches automatically, speeding up the process of addressing critical vulnerabilities [26][31]. For recurring tasks, you can set up QQL-based jobs, which handle up to 2,000 patches in order of their release date [28]. When patches aren’t available or downtime is limited, mitigation scripts can be deployed through the MTG application [29].
The platform supports Windows, Linux, and Mac systems, eliminating the hassle of using multiple tools for different operating systems [29]. For environments with strict oversight, Qualys integrates with ServiceNow, automating the entire workflow from vulnerability detection to ticket closure after a follow-up scan confirms remediation. This ensures every action is documented with an approved change ticket, creating a clear audit trail [27][30]. Additionally, the "Show Only Patchable" toggle in the VMDR Prioritization report helps you focus on vulnerabilities with actionable solutions [31].
CSAM further enhances this process by refining asset prioritization for targeted vulnerability management.
Using CSAM for Asset-Centric Vulnerability Response
CyberSecurity Asset Management (CSAM) shifts the focus from individual vulnerabilities to the overall risk posed by assets. By assigning an Asset Criticality Score (ACS) to each system, CSAM determines its importance to your organization. It then combines this score with vulnerability data to calculate a TruRisk Score, allowing you to address risks based on their impact on your operations rather than just their technical severity.
CSAM gathers data from Cloud Agents, IP scanners, passive sensors, and third-party connectors, often uncovering up to 30% more assets [36]. It also supports up to 20 custom attributes per asset, such as procurement codes or business unit assignments, all searchable via QQL. This level of detail helps pinpoint which assets need immediate attention based on their role in your organization.
"CSAM doesn’t just show us EoL/EoS software and operating systems, it provides the scope of impact so we can understand cyber risk." – Beatrice Sirchis, Vice President of Application Security, IDB Bank [36]
CSAM identifies hardware and software nearing End-of-Life (EoL) or End-of-Support (EoS) up to 12 months in advance, allowing you to address tech debt proactively [36]. The "Quick Actions" menu lets you activate unmanaged assets for VMDR, Certificate View, or Policy Compliance scans instantly. Furthermore, bi-directional CMDB synchronization ensures remediation tickets align with asset data with 96% accuracy, helping IT and security teams stay on the same page [36].
Meeting Compliance Requirements
With CSAM prioritizing assets, Qualys tools help ensure systems meet both regulatory and internal compliance standards.
Policy Compliance (PC) evaluates IT assets against specific policies, identifying gaps across on-premises, remote, and cloud environments [35]. The Security Configuration Assessment (SCA) add-on for VMDR checks for configuration issues based on Center for Internet Security (CIS) Benchmarks [30][35]. VMDR also supports internal, external, and PCI scanning requirements, all within one solution [30].
File Integrity Monitoring (FIM) safeguards sensitive systems by detecting critical changes and incidents [32]. For supply chain compliance, Software Composition Analysis (SwCA) within CSAM provides insights into embedded open-source and commercial software components [33]. CSAM also offers detailed reporting to meet compliance needs, covering hardware and software lifecycles and licensing information [33].
Qualys supports scheduled reports – daily, weekly, or monthly – and provides pre-configured or customizable templates for managing vulnerability and asset data [32]. The VMDR Prioritization Report highlights the riskiest vulnerabilities on critical assets and can be exported as dashboard widgets or CSV files for audits [34]. Unified Dashboards bring together data from all Qualys applications, offering real-time insights into threat exposure and remediation progress. This feature simplifies compliance audits and supports efficient oversight [30][32].
Best Practices for Using Qualys in Cleared Environments
Cleared environments require precise and consistent vulnerability management to maintain operational authorization while minimizing administrative workload. The following practices help security teams strengthen operational security while building on earlier configuration and scanning strategies.
Scan Configurations for Cleared Networks
In most cleared environments, a hybrid scanning approach is the standard. This combines local scanner appliances for internal network visibility with Cloud Agents for continuous, authenticated on-asset assessments [38]. For the best results, configure authenticated scanning to allow for a deeper system evaluation.
Performance tuning is essential in sensitive environments. Set CPU limits to at least 10% and adjust the CPU throttle to 20ms or below. Lower CPU limits (below 10%) can significantly slow scan times and delay updates [39]. To avoid duplicate asset entries and maintain a unified view of vulnerabilities, enable "Agent Scan Merge" [39].
Automated purge rules are also crucial – configure them to remove data from assets that haven’t been scanned within a set period [40]. For environments like VDI or shared infrastructure, use settings like "Scan Delay" and "Scan Randomize" to stagger agent uploads and reduce bursts in I/O activity [39].
Continuous Monitoring and Reporting
Continuous monitoring goes beyond scan configurations, ensuring vulnerabilities are identified and addressed promptly.
Set the VM Data Collection Interval to 240 minutes (4 hours). This ensures that new or fixed vulnerabilities are quickly reflected on the platform [39]. For Policy Compliance and Security Configuration Assessment (SCA), longer intervals – ranging from 2,160 minutes (36 hours) to 10,080 minutes (7 days) – help reduce asset strain while maintaining reliable compliance data [39].
To keep agents updated with minimal data usage, set the Agent Status Interval to 900 seconds (15 minutes). This uses less than 1KB of data per check-in [39]. Real-time alerts are particularly useful for spotting unexpected activity, such as newly opened ports, unauthorized software installations, or unfamiliar hosts, without waiting for the next scheduled scan [41].
Building a Repeatable Vulnerability Management Process
A standardized workflow ensures consistent vulnerability management across cleared environments, as outlined in the Qualys VMDR setup.
Use a default configuration profile with optimized settings for most assets, limiting the number of unique profiles to reduce complexity [39]. Incorporate CIS-certified policies from the Qualys library to align with industry standards [42].
For better asset separation and role-based access control, assign distinct Activation Keys to different operating companies or sensitive enclaves [39]. Enable "Scan on Startup" for Windows Cloud Agents (version 5.1+) to ensure immediate assessment when assets join the network [37]. Blackout windows should only be treated as exceptions during peak mission-critical activities [39].
For high-performance Windows servers in cleared environments, enable "In-Memory SQLite Databases" to minimize disk I/O, though it may increase RAM usage slightly [39]. Additionally, set the Cloud Agent Chunk Size to at least 2,048 KB for file fragment uploads unless the network bandwidth is severely limited [39].
Conclusion
Mastering Qualys tools is a game-changer for meeting strict federal requirements. With its unified approach to asset management, vulnerability detection, and patch management, the platform addresses a critical issue: 38% of cyber intrusions stem from unpatched vulnerabilities [44].
Beyond technical expertise, understanding how to integrate Qualys with ITSM platforms like ServiceNow or BMC can significantly improve efficiency, cutting ticket resolution times by as much as 50% [3]. Additionally, the ability to identify End-of-Life systems up to a year in advance allows agencies to tackle technical debt before it turns into a security risk [3]. These skills not only enhance your career potential but also help organizations align with key compliance standards like FISMA M-24-04, FedRAMP, and NCSC guidelines – essential for security-cleared roles.
Current security practices often fall short of ideal standards. For instance, UK organizations take an average of 17 days to fix external-facing vulnerabilities, far exceeding the NCSC’s recommended 5-day remediation window [1]. Professionals who adopt automated workflows and continuous monitoring can help close this gap while advancing their own expertise and value in the field.
To take full advantage of these opportunities, start with Qualys’s free certification program. Focus on the Vulnerability Management Detection and Response (VMDR) and CyberSecurity Asset Management (CSAM) learning paths to meet federal asset visibility requirements [2][43]. By gaining hands-on experience and certifications, you’ll position yourself as a leader in integrated vulnerability management, bridging IT operations, security, and risk management teams. This proactive approach not only strengthens your career but also equips you to drive meaningful improvements in organizational cybersecurity.
FAQs
When should I use Cloud Agents vs. scanner appliances?
Cloud Agents provide continuous, real-time monitoring across on-premises, cloud, and remote environments. They are especially helpful in dynamic or distributed setups. These lightweight tools are always active, ensuring constant visibility and even syncing data when offline.
On the other hand, scanner appliances are ideal for scheduled, thorough scans of specific network segments or assets where installing agents isn’t feasible. They work particularly well in static environments or when authenticated, on-demand scans are needed.
How do I prioritize fixes using TruRisk, QDS, and QVSS?
To determine which fixes to prioritize, the first step is creating a clear inventory and evaluating the criticality of assets. From there, apply QDS to gauge how severe each vulnerability is and calculate the TruRisk™ Score. This score factors in both the importance of the asset and the surrounding threat landscape. For a straightforward comparison, use QVSS, which simplifies vulnerability ratings into an easy-to-understand 0-10 scale. This approach helps you focus on the highest-risk issues, ensuring your efforts have the greatest impact on reducing risk.
What’s the best way to set up Qualys for air-gapped networks?
To set up Qualys for air-gapped networks, the Offline Scanner Appliance is your go-to solution. Start by downloading the OVA image and deploying it on a virtualization platform such as VMware. Configure the network adapters to match your specific environment. Next, generate a personalization code to register the scanner. Once registered, switch the appliance to OFFLINE SCANNING mode. This setup ensures secure vulnerability scans within the isolated air-gapped network.
Related Blog Posts
Tenable Nessus for Cleared Vulnerability Analysts Skills Guide
Tenable Nessus is a trusted tool for vulnerability scanning, particularly in high-security environments requiring strict compliance. Supporting over 119,000 CVEs and 325,000+ plugins, it provides precise results with minimal errors. This guide focuses on deploying Nessus in restricted settings, configuring secure scans, and prioritizing risks effectively.
Key highlights include:
- Offline Deployment: Use "Register Offline" for air-gapped networks.
- Compliance Features: NIAP standards, FIPS modules, TLS 1.2 enforcement.
- Credentialed Scans: Securely access systems for deeper vulnerability insights.
- Risk Prioritization: Leverage CVSS and VPR scores to address critical threats.
From installation to advanced configuration, this guide outlines actionable steps to secure classified systems while meeting regulatory standards.
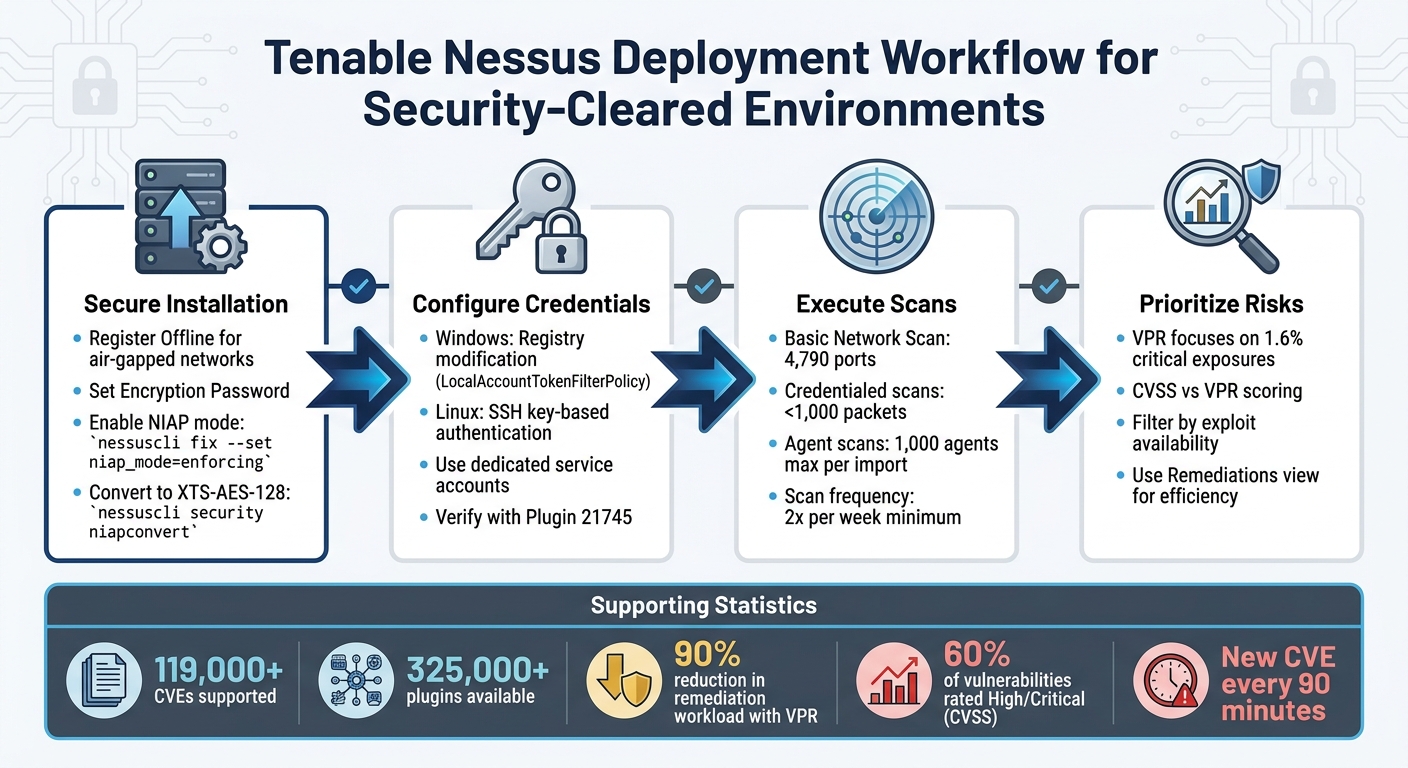
Nessus Deployment Workflow for Security-Cleared Environments
Tenable Vulnerability Management | Creating Nessus Basic Network Scans
sbb-itb-bf7aa6b
Setting Up Nessus in Security-Cleared Environments
Installing Nessus in environments with strict security requirements involves offline deployment, encryption, and adherence to rigorous protocols. These setups differ from standard installations due to limited network access and heightened security measures. Below are the specific steps for deploying Nessus in such environments.
Installing Tenable Nessus Professional or Expert
In air-gapped networks, select the "Register Offline" option during installation to ensure the scanner operates without internet connectivity [2]. During configuration, set an Encryption Password to secure policies, scan results, and settings. Be sure to store this password securely, as it cannot be recovered if lost [2].
For environments requiring NIAP compliance, activate NIAP mode by running the command:
nessuscli fix --set niap_mode=enforcing
This enforces the use of TLS 1.2, strict certificate validation, and NIAP-approved cryptographic ciphers [1]. Additionally, convert encrypted databases to the XTS-AES-128 format using:
nessuscli security niapconvert
This ensures database encryption meets NIAP standards [1].
| NIAP Mode Setting | Requirement/Action |
|---|---|
| SSL Mode | Forced to TLS 1.2 [1] |
| Database Encryption | Converted to XTS-AES-128 [1] |
| Certificate Validation | Enforced with revocation checks via OCSP; requires a CA extension [1] |
| FIPS Module | Enabled for secure communication and database encryption [1] |
Setting Up Credentials for Authenticated Scans
Authenticated scans provide deeper insights into vulnerabilities compared to unauthenticated scans. They are also less intrusive, typically sending fewer than 1,000 packets, as opposed to hundreds of thousands for non-credentialed scans [12][8].
To enhance security, use dedicated service accounts for scanning rather than high-level or personal admin accounts [12][8]. These accounts should have administrator privileges on Windows or root-equivalent access on Linux to ensure thorough scanning. Implement safeguards such as log monitoring, regular password changes, and enabling accounts only during active scans [13].
For Windows systems, follow these steps:
- Modify the registry to allow remote authenticated scans without disabling UAC. Add a DWORD entry named
LocalAccountTokenFilterPolicywith a value of1under:
HKLMSOFTWAREMicrosoftWindowsCurrentVersionPoliciessystem[9]. - Configure Group Policy Objects (GPO) to allow inbound WMI rules (ASync-In, WMI-In, and DCOM-In) and enable "File and Printer Sharing" on TCP ports 139 and 445 [9].
- Ensure the "Remote Registry" service is set to "Manual" or "Enabled." Nessus can start this service automatically during scans if the credentials have administrative permissions [9].
For Linux systems, use SSH key-based authentication rather than passwords [13][15]. Configure privilege escalation using methods like sudo, su, pbrun, or dzdo to avoid direct remote root logins [13][15]. Enable the "Attempt least privilege" option in SSH settings to allow Nessus to use a lower-privilege account and escalate only when needed. Note that this may increase scan times by up to 30% [15].
To confirm that credentials are properly configured, use Plugin 21745. This plugin reports only if authentication fails, making it a reliable troubleshooting tool [10]. Once credentials are set, you can link Nessus to Tenable Vulnerability Management for centralized reporting.
Connecting Nessus with Tenable Vulnerability Management
Integrating Nessus with Tenable Vulnerability Management consolidates your analysis and reporting efforts. To link the scanner, generate a unique linking key from the Tenable VM console under Settings > Sensors > Linked Scanners > Add Nessus Scanner [11].
In FedRAMP-compliant environments, use the --fedcloud flag when linking via the command line:
nessuscli managed link --key=<LINKING KEY> --fedcloud [11].
Ensure the scanner can communicate with *.cloud.tenable.com (or sensor.cloud.tenable.com) on TCP port 443 [11][16]. Add these endpoints to your firewall allowlist before linking. If internet access requires a proxy, configure the Proxy Server settings in the Nessus UI or via the CLI before proceeding [2].
If the scanner was previously linked to another Tenable product, such as Tenable Security Center, reset it by running:
nessuscli fix --reset-all
This command removes all existing users and data [11]. For environments using custom CA certificates, copy the certificate to custom_CA.inc in the plugins directory to ensure SSL validation passes [1].
Running and Managing Vulnerability Scans
Once you’ve set up secure deployments and configured credentials, the next step is running scans that align with your security protocols. The scanning process can vary depending on your network’s structure, security needs, and the assets you’re assessing. Properly configuring scan types ensures you gather accurate risk data without disrupting critical systems.
Setting Up Basic Network Scans
Start with a host discovery scan to pinpoint active assets [6]. After mapping your network, the Basic Network Scan template is a great starting point. This template includes default settings and covers about 4,790 commonly used ports listed in the nessus-services file [17].
Fine-tune accuracy settings to strike a balance between reducing false positives and conducting in-depth analysis. For example, enabling "Perform thorough tests" allows plugins to dig deeper – like searching three directory levels in SMB shares rather than just one [3]. While this delivers better results, it can increase network traffic, so use it carefully in production environments.
In production, always enable "Safe Checks" to avoid disruptive plugin activity [17]. Running full vulnerability scans at least twice a week helps maintain a clear security picture [17]. To minimize network strain, enable the "Slow down the scan when network congestion is detected" option. This feature allows Nessus to throttle traffic automatically when the network is under heavy load [17]. For better performance, focus scans on specific assets to reduce the overall impact on your network [17].
Deploying Agent Scans for Endpoint Coverage
Agent-based scanning is a practical option for endpoints where remote credentials aren’t feasible. This method removes the need for manual credential updates or sharing sensitive information among administrators in restricted networks [18]. Agents require at least 1 GB of RAM, 3 GB of disk space (4 GB recommended), and disk speeds of 15–50 IOPS [18]. While idle, agents use minimal CPU, but during active scans, they can consume up to 100% of available CPU [18].
Agents are particularly useful for systems where credentialed access is impractical, such as Domain Controllers, DMZs, or Certificate Authority (CA) networks [18]. To avoid performance issues, limit scans to 1,000 agents at a time when importing data into management consoles [19].
Deploy agents systematically: install and link them using the nessuscli agent link command, group assets into agent groups, adjust default settings, and configure "Freeze Windows" to pause scans during critical operations [20]. For shared environments like VDI or ESXi, set "Plugin Compilation Performance" to medium or low to reduce the CPU load on the host [19]. For complete coverage, combine agent-based and network scanning. This hybrid approach is particularly recommended for U.S. Federal Government organizations to comply with legal requirements for comprehensive risk assessments [19].
Running Credentialed Scans in Restricted Networks
Credentialed scans provide deeper insights into system vulnerabilities, offering more detailed data for risk analysis [24]. In restricted environments, use accounts with administrator or root-level access to ensure the scanner can retrieve necessary files, registry settings, and patch details [13][23]. However, for high-security zones like DMZs or Domain Controllers, Nessus Agents are a better choice since they eliminate the need for credential management and remote logins [22].
For Windows scans in restricted networks, follow these best practices: create a "Nessus Local Access" security group and use a Group Policy Object (GPO) to add this group to the local Administrators group on all target machines [23]. Make sure administrative shares (IPC$, ADMIN$, and C$) are enabled, as Windows 10 disables ADMIN$ by default [23]. For Linux scans, improve security by generating an ECDSA or RSA key pair and placing the public key in the authorized_keys file of a dedicated "nessus" user account. Keep the private key exclusively on the Nessus scanner [21].
Enable scanning accounts only during active scanning windows and disable them immediately afterward [13]. Set up alerts and monitor logs to detect any unauthorized use of scanning accounts outside of approved times [13]. If multiple credentials of the same type are used, Nessus will try them in the order they were added, so prioritize the most relevant or highest-privilege credential [14].
Analyzing Results and Prioritizing Vulnerabilities
Once scans are finished, the next step is interpreting the data to prioritize the vulnerabilities identified. Nessus offers two main outputs: Reports (available in PDF or HTML formats) for stakeholders and Exports (in XML, CSV, or .db files) for tasks like database integration and auditing [25]. These outputs are essential for leveraging scoring systems that help guide remediation strategies. Let’s break down how to interpret these reports and exports for actionable next steps.
Reading Vulnerability Reports and Misconfigurations
Nessus assesses vulnerabilities using two scoring systems: the static CVSS (Common Vulnerability Scoring System) and the dynamic VPR (Vulnerability Priority Rating). While CVSS scores indicate the potential severity of a vulnerability, VPR – updated daily by Tenable – reflects the current threat landscape. VPR scores range from 0.1 to 10.0, with higher numbers signaling a greater likelihood of exploitation [26].
| Severity | CVSSv3/v4 Range | VPR Range |
|---|---|---|
| Critical | 9.0 – 10.0 | 9.0 – 10.0 |
| High | 7.0 – 8.9 | 7.0 – 8.9 |
| Medium | 4.0 – 6.9 | 4.0 – 6.9 |
| Low | 0.1 – 3.9 | 0.1 – 3.9 |
These ratings help you focus on the vulnerabilities most likely to be exploited. To streamline remediation efforts, the Remediations view is particularly useful, as it highlights fixes that can resolve multiple vulnerabilities simultaneously [28]. For configuration-related issues, the Compliance view organizes details by severity, provided compliance checks were included in the scan [28].
To zero in on high-risk vulnerabilities, apply Filters. For example, you can isolate vulnerabilities with an available exploit or those with a VPR score above 8.0 [27]. When reviewing VPR data, pay close attention to the "Exploit Code Maturity" driver. Ratings like "High" or "Functional" indicate an immediate threat, while "PoC" (Proof of Concept) or "Unproven" suggest a lower likelihood of immediate exploitation [26].
Using Attack Path Analysis to Prioritize Risks
Once you’ve reviewed the reports, attack path analysis can help refine your prioritization further. One challenge with traditional CVSS scoring is that roughly 60% of vulnerabilities are classified as "High" or "Critical", which can lead to alert fatigue [29]. Attack path analysis complements these scores by highlighting only the most pressing threats. Unlike CVSS, VPR narrows the focus to the 1.6% of vulnerabilities that pose an immediate and significant risk, significantly reducing remediation workloads – by as much as 90% compared to CVSS-based methods [29].
"VPR pinpoints the 1.6% of exposures that truly pose a risk." – Tenable [29]
The VPR Top Threats view is an excellent tool for identifying vulnerabilities that are actively exploited or are likely to be weaponized soon. Pay particular attention to findings where the Nessus plugin output indicates "Exploited by Nessus", as these represent vulnerabilities that are easily exploitable in your environment [30]. Additionally, the "Unsupported by Vendor" filter can help you locate software that no longer receives security patches – often a sign of critical flaws not reflected in standard severity counts [30].
VPR uses five key drivers to provide a well-rounded risk assessment: Exploit Code Maturity, Threat Intensity, Threat Recency, Threat Sources, and Product Coverage [26]. This comprehensive approach ensures that your prioritization efforts are focused on the vulnerabilities that matter most.
Advanced Techniques and Best Practices
These techniques help fine-tune the use of Nessus in secure environments, ensuring scans are not only efficient but also adhere to stringent compliance requirements.
Creating Custom Policies and Configuring Plugins
When default templates don’t meet the needs of classified environments, switch to the Advanced Scan template for more detailed configuration [31][33]. Adjust settings like "Max simultaneous checks per host" (default: 5) and "Max simultaneous hosts per scan" (default: 30) to optimize performance while minimizing network strain [32].
For dynamic plugin management, the Advanced Dynamic Scan template is a game-changer. It uses filters to automatically include new plugins as Tenable releases them. Always enable the "Auto Enable Plugin Dependencies" option to ensure essential plugins are included for comprehensive data collection. For compliance-focused environments, integrate specific Audit Files to verify configurations against standards like DISA STIGs or CIS benchmarks [33].
| Accuracy Setting | Description | Best Use Case |
|---|---|---|
| Normal | Default setting for balanced flaw reporting. | General production environments. |
| Avoid potential false alarms | Skips reporting flaws if there’s any uncertainty. | When remediation resources are limited. |
| Paranoid | Reports all potential flaws, even with minimal evidence. | High-security environments where risks must be minimized. |
From here, generating actionable reports is key to driving remediation efforts.
Creating Reports and Tracking Remediation Progress
Reports should focus on high-priority vulnerabilities and critical assets. Use filters to refine results and make the data actionable [34].
To monitor progress, the Compare Scan Results feature is invaluable. It highlights changes between scans, helping track improvements over time [34][25]. You can also group vulnerabilities by attributes like CPE, service, or protocol to simplify results. If certain findings don’t need immediate attention, the "Snooze" feature allows you to pause them for a set period (1 day to 1 month) [4]. For compliance audits, upload audit files provided by Tenable, SCAP Data Stream files with OVAL and XCCDF content, or custom audit files tailored to your needs [35].
Aligning Scans with Security Standards and Requirements
To meet compliance demands in classified environments, align scans with established security frameworks.
For environments governed by strict standards like NIST or DoD requirements, use the SCAP and OVAL Auditing template. This ensures scans meet government-specific policies for vulnerability and compliance management [33]. Configure the Compliance tab to include audit files that validate adherence to these standards [35].
In high-availability systems, enable the "Slow down the scan when network congestion is detected" option to avoid triggering intrusion detection systems [32]. For virtualized environments, the "Stagger scan start" setting helps reduce CPU usage across multiple agents [32]. Similarly, when dealing with slow or high-latency links, increase the network timeout from the default 5 seconds to account for delays [32].
Custom policies can also be exported as .nessus files for use across different Tenable Security Center instances. However, remember to reconfigure credentials and audit files after importing them [31].
Conclusion
Becoming proficient with Tenable Nessus in security-cleared environments goes beyond simply running scans – it demands a thoughtful and strategic approach to managing vulnerabilities. Credentialed scans are a game-changer, offering deeper insights while keeping network traffic minimal [5][8]. This efficiency is especially critical in tightly controlled networks where bandwidth is at a premium.
Once scans are properly configured, the focus shifts to translating results into actionable risk management. It’s essential to understand the difference between vulnerability scanning and compliance auditing. As Tenable highlights:
"A lack of vulnerabilities does not mean the servers are configured correctly or are ‘compliant’ with a particular standard" [7]
In other words, just because vulnerabilities aren’t detected doesn’t mean the system is configured properly or meets compliance standards. Combining vulnerability scans with compliance audits ensures systems are secure beyond just applying patches. Considering that a new CVE is identified roughly every 90 minutes, conducting scans at least twice a week is key to staying ahead of potential threats [8].
As discussed in earlier sections, prioritization is the hallmark of effective vulnerability management. Tools like the Vulnerability Priority Rating (VPR) help focus remediation efforts on the most critical issues. Features such as vulnerability grouping and the "Snooze" function can help streamline workflows, reducing noise while maintaining visibility.
In environments with strict compliance requirements, aligning scan strategies with relevant security standards prepares teams for audits. Using dedicated scanning accounts with admin-level permissions also protects sensitive production credentials. These practices, when consistently applied, transform Nessus into a robust tool for managing vulnerabilities in security-cleared settings.
FAQs
How do I update Nessus plugins in an air-gapped network?
To update Nessus plugins on an air-gapped network, you’ll need to handle the process manually. Here’s how:
- Start by downloading the plugin archive (a TAR file) from the Tenable website using a computer that has internet access.
- Transfer this TAR file to the offline Nessus system using a secure method, like a USB drive.
- Open the Nessus interface on the offline system. Navigate to Settings > About, choose Manual Software Update, and upload the TAR file.
- Alternatively, if you prefer using the command line, execute the update with the
nessuscli updatecommand in the terminal.
This process ensures your Nessus system stays current, even without direct internet access.
When should I use Nessus Agents instead of credentialed network scans?
When you need continuous, on-host visibility, Nessus Agents are the way to go – especially for devices that are often off the network or only sporadically connected, like laptops or remote endpoints. These agents don’t rely on network connectivity, making them perfect for mobile devices, environments with high latency, or networks that are segmented.
On the flip side, credentialed network scans are better suited for centralized vulnerability assessments within a connected network. However, they do require active network connectivity and proper credential management to function effectively.
What’s the best way to prioritize fixes using VPR vs CVSS?
VPR, or Vulnerability Priority Rating, adapts to changing conditions by using threat intelligence and predictive analytics. It focuses on identifying vulnerabilities that are most likely to be exploited, making it especially helpful for tackling immediate risks.
In contrast, CVSS (Common Vulnerability Scoring System) delivers a fixed severity score based on factors such as confidentiality and availability impact. This makes it a solid tool for baseline assessments.
While CVSS helps in understanding the inherent severity of a vulnerability, VPR takes a more forward-looking approach, making it better suited for addressing dynamic and evolving threats.