Tenable Nessus is a trusted tool for vulnerability scanning, particularly in high-security environments requiring strict compliance. Supporting over 119,000 CVEs and 325,000+ plugins, it provides precise results with minimal errors. This guide focuses on deploying Nessus in restricted settings, configuring secure scans, and prioritizing risks effectively.
Key highlights include:
- Offline Deployment: Use "Register Offline" for air-gapped networks.
- Compliance Features: NIAP standards, FIPS modules, TLS 1.2 enforcement.
- Credentialed Scans: Securely access systems for deeper vulnerability insights.
- Risk Prioritization: Leverage CVSS and VPR scores to address critical threats.
From installation to advanced configuration, this guide outlines actionable steps to secure classified systems while meeting regulatory standards.
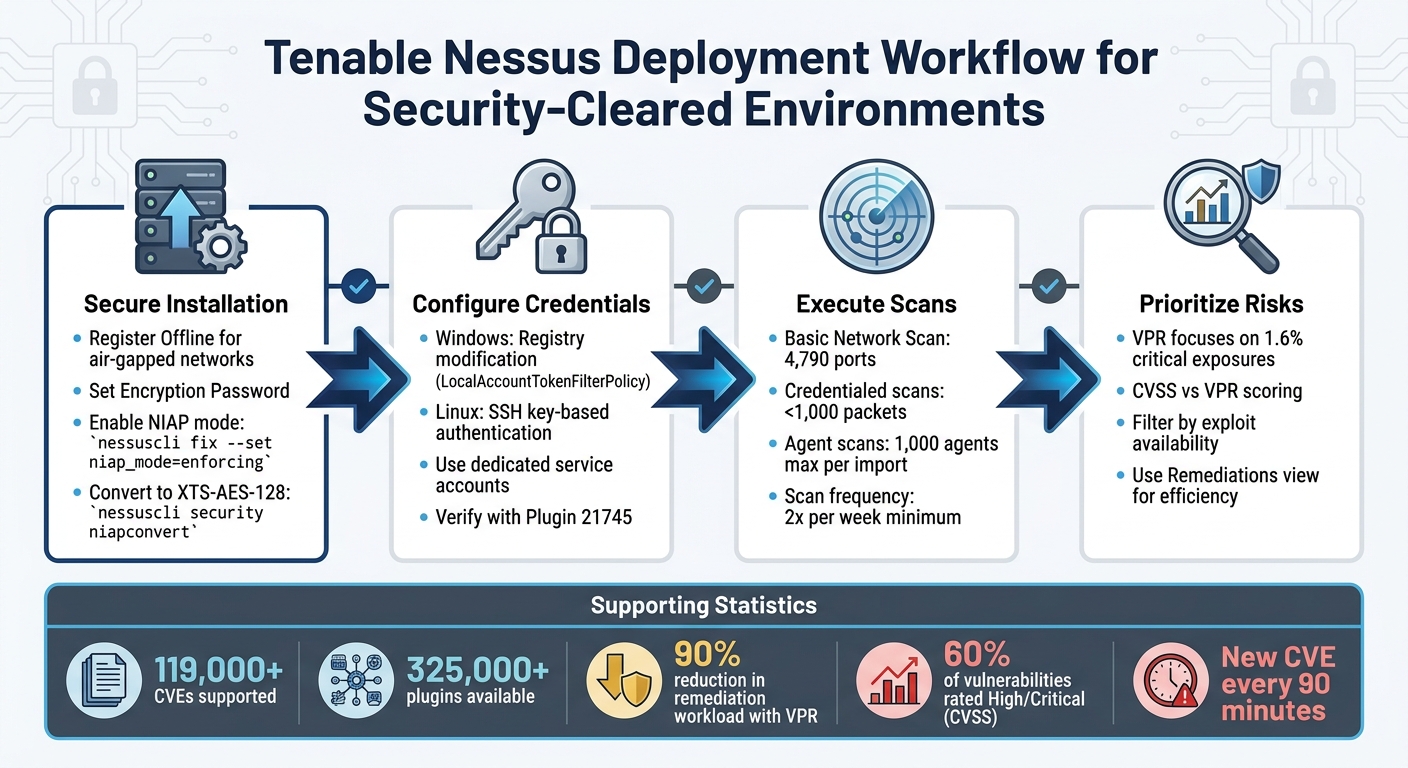
Nessus Deployment Workflow for Security-Cleared Environments
Tenable Vulnerability Management | Creating Nessus Basic Network Scans
sbb-itb-bf7aa6b
Setting Up Nessus in Security-Cleared Environments
Installing Nessus in environments with strict security requirements involves offline deployment, encryption, and adherence to rigorous protocols. These setups differ from standard installations due to limited network access and heightened security measures. Below are the specific steps for deploying Nessus in such environments.
Installing Tenable Nessus Professional or Expert
In air-gapped networks, select the "Register Offline" option during installation to ensure the scanner operates without internet connectivity [2]. During configuration, set an Encryption Password to secure policies, scan results, and settings. Be sure to store this password securely, as it cannot be recovered if lost [2].
For environments requiring NIAP compliance, activate NIAP mode by running the command:
nessuscli fix --set niap_mode=enforcing
This enforces the use of TLS 1.2, strict certificate validation, and NIAP-approved cryptographic ciphers [1]. Additionally, convert encrypted databases to the XTS-AES-128 format using:
nessuscli security niapconvert
This ensures database encryption meets NIAP standards [1].
| NIAP Mode Setting | Requirement/Action |
|---|---|
| SSL Mode | Forced to TLS 1.2 [1] |
| Database Encryption | Converted to XTS-AES-128 [1] |
| Certificate Validation | Enforced with revocation checks via OCSP; requires a CA extension [1] |
| FIPS Module | Enabled for secure communication and database encryption [1] |
Setting Up Credentials for Authenticated Scans
Authenticated scans provide deeper insights into vulnerabilities compared to unauthenticated scans. They are also less intrusive, typically sending fewer than 1,000 packets, as opposed to hundreds of thousands for non-credentialed scans [12][8].
To enhance security, use dedicated service accounts for scanning rather than high-level or personal admin accounts [12][8]. These accounts should have administrator privileges on Windows or root-equivalent access on Linux to ensure thorough scanning. Implement safeguards such as log monitoring, regular password changes, and enabling accounts only during active scans [13].
For Windows systems, follow these steps:
- Modify the registry to allow remote authenticated scans without disabling UAC. Add a DWORD entry named
LocalAccountTokenFilterPolicywith a value of1under:
HKLMSOFTWAREMicrosoftWindowsCurrentVersionPoliciessystem[9]. - Configure Group Policy Objects (GPO) to allow inbound WMI rules (ASync-In, WMI-In, and DCOM-In) and enable "File and Printer Sharing" on TCP ports 139 and 445 [9].
- Ensure the "Remote Registry" service is set to "Manual" or "Enabled." Nessus can start this service automatically during scans if the credentials have administrative permissions [9].
For Linux systems, use SSH key-based authentication rather than passwords [13][15]. Configure privilege escalation using methods like sudo, su, pbrun, or dzdo to avoid direct remote root logins [13][15]. Enable the "Attempt least privilege" option in SSH settings to allow Nessus to use a lower-privilege account and escalate only when needed. Note that this may increase scan times by up to 30% [15].
To confirm that credentials are properly configured, use Plugin 21745. This plugin reports only if authentication fails, making it a reliable troubleshooting tool [10]. Once credentials are set, you can link Nessus to Tenable Vulnerability Management for centralized reporting.
Connecting Nessus with Tenable Vulnerability Management
Integrating Nessus with Tenable Vulnerability Management consolidates your analysis and reporting efforts. To link the scanner, generate a unique linking key from the Tenable VM console under Settings > Sensors > Linked Scanners > Add Nessus Scanner [11].
In FedRAMP-compliant environments, use the --fedcloud flag when linking via the command line:
nessuscli managed link --key=<LINKING KEY> --fedcloud [11].
Ensure the scanner can communicate with *.cloud.tenable.com (or sensor.cloud.tenable.com) on TCP port 443 [11][16]. Add these endpoints to your firewall allowlist before linking. If internet access requires a proxy, configure the Proxy Server settings in the Nessus UI or via the CLI before proceeding [2].
If the scanner was previously linked to another Tenable product, such as Tenable Security Center, reset it by running:
nessuscli fix --reset-all
This command removes all existing users and data [11]. For environments using custom CA certificates, copy the certificate to custom_CA.inc in the plugins directory to ensure SSL validation passes [1].
Running and Managing Vulnerability Scans
Once you’ve set up secure deployments and configured credentials, the next step is running scans that align with your security protocols. The scanning process can vary depending on your network’s structure, security needs, and the assets you’re assessing. Properly configuring scan types ensures you gather accurate risk data without disrupting critical systems.
Setting Up Basic Network Scans
Start with a host discovery scan to pinpoint active assets [6]. After mapping your network, the Basic Network Scan template is a great starting point. This template includes default settings and covers about 4,790 commonly used ports listed in the nessus-services file [17].
Fine-tune accuracy settings to strike a balance between reducing false positives and conducting in-depth analysis. For example, enabling "Perform thorough tests" allows plugins to dig deeper – like searching three directory levels in SMB shares rather than just one [3]. While this delivers better results, it can increase network traffic, so use it carefully in production environments.
In production, always enable "Safe Checks" to avoid disruptive plugin activity [17]. Running full vulnerability scans at least twice a week helps maintain a clear security picture [17]. To minimize network strain, enable the "Slow down the scan when network congestion is detected" option. This feature allows Nessus to throttle traffic automatically when the network is under heavy load [17]. For better performance, focus scans on specific assets to reduce the overall impact on your network [17].
Deploying Agent Scans for Endpoint Coverage
Agent-based scanning is a practical option for endpoints where remote credentials aren’t feasible. This method removes the need for manual credential updates or sharing sensitive information among administrators in restricted networks [18]. Agents require at least 1 GB of RAM, 3 GB of disk space (4 GB recommended), and disk speeds of 15–50 IOPS [18]. While idle, agents use minimal CPU, but during active scans, they can consume up to 100% of available CPU [18].
Agents are particularly useful for systems where credentialed access is impractical, such as Domain Controllers, DMZs, or Certificate Authority (CA) networks [18]. To avoid performance issues, limit scans to 1,000 agents at a time when importing data into management consoles [19].
Deploy agents systematically: install and link them using the nessuscli agent link command, group assets into agent groups, adjust default settings, and configure "Freeze Windows" to pause scans during critical operations [20]. For shared environments like VDI or ESXi, set "Plugin Compilation Performance" to medium or low to reduce the CPU load on the host [19]. For complete coverage, combine agent-based and network scanning. This hybrid approach is particularly recommended for U.S. Federal Government organizations to comply with legal requirements for comprehensive risk assessments [19].
Running Credentialed Scans in Restricted Networks
Credentialed scans provide deeper insights into system vulnerabilities, offering more detailed data for risk analysis [24]. In restricted environments, use accounts with administrator or root-level access to ensure the scanner can retrieve necessary files, registry settings, and patch details [13][23]. However, for high-security zones like DMZs or Domain Controllers, Nessus Agents are a better choice since they eliminate the need for credential management and remote logins [22].
For Windows scans in restricted networks, follow these best practices: create a "Nessus Local Access" security group and use a Group Policy Object (GPO) to add this group to the local Administrators group on all target machines [23]. Make sure administrative shares (IPC$, ADMIN$, and C$) are enabled, as Windows 10 disables ADMIN$ by default [23]. For Linux scans, improve security by generating an ECDSA or RSA key pair and placing the public key in the authorized_keys file of a dedicated "nessus" user account. Keep the private key exclusively on the Nessus scanner [21].
Enable scanning accounts only during active scanning windows and disable them immediately afterward [13]. Set up alerts and monitor logs to detect any unauthorized use of scanning accounts outside of approved times [13]. If multiple credentials of the same type are used, Nessus will try them in the order they were added, so prioritize the most relevant or highest-privilege credential [14].
Analyzing Results and Prioritizing Vulnerabilities
Once scans are finished, the next step is interpreting the data to prioritize the vulnerabilities identified. Nessus offers two main outputs: Reports (available in PDF or HTML formats) for stakeholders and Exports (in XML, CSV, or .db files) for tasks like database integration and auditing [25]. These outputs are essential for leveraging scoring systems that help guide remediation strategies. Let’s break down how to interpret these reports and exports for actionable next steps.
Reading Vulnerability Reports and Misconfigurations
Nessus assesses vulnerabilities using two scoring systems: the static CVSS (Common Vulnerability Scoring System) and the dynamic VPR (Vulnerability Priority Rating). While CVSS scores indicate the potential severity of a vulnerability, VPR – updated daily by Tenable – reflects the current threat landscape. VPR scores range from 0.1 to 10.0, with higher numbers signaling a greater likelihood of exploitation [26].
| Severity | CVSSv3/v4 Range | VPR Range |
|---|---|---|
| Critical | 9.0 – 10.0 | 9.0 – 10.0 |
| High | 7.0 – 8.9 | 7.0 – 8.9 |
| Medium | 4.0 – 6.9 | 4.0 – 6.9 |
| Low | 0.1 – 3.9 | 0.1 – 3.9 |
These ratings help you focus on the vulnerabilities most likely to be exploited. To streamline remediation efforts, the Remediations view is particularly useful, as it highlights fixes that can resolve multiple vulnerabilities simultaneously [28]. For configuration-related issues, the Compliance view organizes details by severity, provided compliance checks were included in the scan [28].
To zero in on high-risk vulnerabilities, apply Filters. For example, you can isolate vulnerabilities with an available exploit or those with a VPR score above 8.0 [27]. When reviewing VPR data, pay close attention to the "Exploit Code Maturity" driver. Ratings like "High" or "Functional" indicate an immediate threat, while "PoC" (Proof of Concept) or "Unproven" suggest a lower likelihood of immediate exploitation [26].
Using Attack Path Analysis to Prioritize Risks
Once you’ve reviewed the reports, attack path analysis can help refine your prioritization further. One challenge with traditional CVSS scoring is that roughly 60% of vulnerabilities are classified as "High" or "Critical", which can lead to alert fatigue [29]. Attack path analysis complements these scores by highlighting only the most pressing threats. Unlike CVSS, VPR narrows the focus to the 1.6% of vulnerabilities that pose an immediate and significant risk, significantly reducing remediation workloads – by as much as 90% compared to CVSS-based methods [29].
"VPR pinpoints the 1.6% of exposures that truly pose a risk." – Tenable [29]
The VPR Top Threats view is an excellent tool for identifying vulnerabilities that are actively exploited or are likely to be weaponized soon. Pay particular attention to findings where the Nessus plugin output indicates "Exploited by Nessus", as these represent vulnerabilities that are easily exploitable in your environment [30]. Additionally, the "Unsupported by Vendor" filter can help you locate software that no longer receives security patches – often a sign of critical flaws not reflected in standard severity counts [30].
VPR uses five key drivers to provide a well-rounded risk assessment: Exploit Code Maturity, Threat Intensity, Threat Recency, Threat Sources, and Product Coverage [26]. This comprehensive approach ensures that your prioritization efforts are focused on the vulnerabilities that matter most.
Advanced Techniques and Best Practices
These techniques help fine-tune the use of Nessus in secure environments, ensuring scans are not only efficient but also adhere to stringent compliance requirements.
Creating Custom Policies and Configuring Plugins
When default templates don’t meet the needs of classified environments, switch to the Advanced Scan template for more detailed configuration [31][33]. Adjust settings like "Max simultaneous checks per host" (default: 5) and "Max simultaneous hosts per scan" (default: 30) to optimize performance while minimizing network strain [32].
For dynamic plugin management, the Advanced Dynamic Scan template is a game-changer. It uses filters to automatically include new plugins as Tenable releases them. Always enable the "Auto Enable Plugin Dependencies" option to ensure essential plugins are included for comprehensive data collection. For compliance-focused environments, integrate specific Audit Files to verify configurations against standards like DISA STIGs or CIS benchmarks [33].
| Accuracy Setting | Description | Best Use Case |
|---|---|---|
| Normal | Default setting for balanced flaw reporting. | General production environments. |
| Avoid potential false alarms | Skips reporting flaws if there’s any uncertainty. | When remediation resources are limited. |
| Paranoid | Reports all potential flaws, even with minimal evidence. | High-security environments where risks must be minimized. |
From here, generating actionable reports is key to driving remediation efforts.
Creating Reports and Tracking Remediation Progress
Reports should focus on high-priority vulnerabilities and critical assets. Use filters to refine results and make the data actionable [34].
To monitor progress, the Compare Scan Results feature is invaluable. It highlights changes between scans, helping track improvements over time [34][25]. You can also group vulnerabilities by attributes like CPE, service, or protocol to simplify results. If certain findings don’t need immediate attention, the "Snooze" feature allows you to pause them for a set period (1 day to 1 month) [4]. For compliance audits, upload audit files provided by Tenable, SCAP Data Stream files with OVAL and XCCDF content, or custom audit files tailored to your needs [35].
Aligning Scans with Security Standards and Requirements
To meet compliance demands in classified environments, align scans with established security frameworks.
For environments governed by strict standards like NIST or DoD requirements, use the SCAP and OVAL Auditing template. This ensures scans meet government-specific policies for vulnerability and compliance management [33]. Configure the Compliance tab to include audit files that validate adherence to these standards [35].
In high-availability systems, enable the "Slow down the scan when network congestion is detected" option to avoid triggering intrusion detection systems [32]. For virtualized environments, the "Stagger scan start" setting helps reduce CPU usage across multiple agents [32]. Similarly, when dealing with slow or high-latency links, increase the network timeout from the default 5 seconds to account for delays [32].
Custom policies can also be exported as .nessus files for use across different Tenable Security Center instances. However, remember to reconfigure credentials and audit files after importing them [31].
Conclusion
Becoming proficient with Tenable Nessus in security-cleared environments goes beyond simply running scans – it demands a thoughtful and strategic approach to managing vulnerabilities. Credentialed scans are a game-changer, offering deeper insights while keeping network traffic minimal [5][8]. This efficiency is especially critical in tightly controlled networks where bandwidth is at a premium.
Once scans are properly configured, the focus shifts to translating results into actionable risk management. It’s essential to understand the difference between vulnerability scanning and compliance auditing. As Tenable highlights:
"A lack of vulnerabilities does not mean the servers are configured correctly or are ‘compliant’ with a particular standard" [7]
In other words, just because vulnerabilities aren’t detected doesn’t mean the system is configured properly or meets compliance standards. Combining vulnerability scans with compliance audits ensures systems are secure beyond just applying patches. Considering that a new CVE is identified roughly every 90 minutes, conducting scans at least twice a week is key to staying ahead of potential threats [8].
As discussed in earlier sections, prioritization is the hallmark of effective vulnerability management. Tools like the Vulnerability Priority Rating (VPR) help focus remediation efforts on the most critical issues. Features such as vulnerability grouping and the "Snooze" function can help streamline workflows, reducing noise while maintaining visibility.
In environments with strict compliance requirements, aligning scan strategies with relevant security standards prepares teams for audits. Using dedicated scanning accounts with admin-level permissions also protects sensitive production credentials. These practices, when consistently applied, transform Nessus into a robust tool for managing vulnerabilities in security-cleared settings.
FAQs
How do I update Nessus plugins in an air-gapped network?
To update Nessus plugins on an air-gapped network, you’ll need to handle the process manually. Here’s how:
- Start by downloading the plugin archive (a TAR file) from the Tenable website using a computer that has internet access.
- Transfer this TAR file to the offline Nessus system using a secure method, like a USB drive.
- Open the Nessus interface on the offline system. Navigate to Settings > About, choose Manual Software Update, and upload the TAR file.
- Alternatively, if you prefer using the command line, execute the update with the
nessuscli updatecommand in the terminal.
This process ensures your Nessus system stays current, even without direct internet access.
When should I use Nessus Agents instead of credentialed network scans?
When you need continuous, on-host visibility, Nessus Agents are the way to go – especially for devices that are often off the network or only sporadically connected, like laptops or remote endpoints. These agents don’t rely on network connectivity, making them perfect for mobile devices, environments with high latency, or networks that are segmented.
On the flip side, credentialed network scans are better suited for centralized vulnerability assessments within a connected network. However, they do require active network connectivity and proper credential management to function effectively.
What’s the best way to prioritize fixes using VPR vs CVSS?
VPR, or Vulnerability Priority Rating, adapts to changing conditions by using threat intelligence and predictive analytics. It focuses on identifying vulnerabilities that are most likely to be exploited, making it especially helpful for tackling immediate risks.
In contrast, CVSS (Common Vulnerability Scoring System) delivers a fixed severity score based on factors such as confidentiality and availability impact. This makes it a solid tool for baseline assessments.
While CVSS helps in understanding the inherent severity of a vulnerability, VPR takes a more forward-looking approach, making it better suited for addressing dynamic and evolving threats.