Burp Suite is a must-have tool for penetration testers working in secure and classified environments. It offers unmatched capabilities to find vulnerabilities in web applications, ensuring systems are safeguarded against attackers. This guide covers everything you need to know – from setting up Burp Suite in high-security environments to using its tools like Proxy, Repeater, and Intruder for effective testing.
Key takeaways:
- Why Burp Suite Matters: Essential for cleared professionals due to its ability to analyze complex infrastructures while maintaining strict data control.
- Core Tools: Proxy for traffic interception, Repeater for manual testing, and Intruder for automated attacks.
- Setup in Secure Environments: Focus on air-gapped networks, strict access controls, and compliance protocols.
- Advanced Features: Extensions like Turbo Intruder, Param Miner, and Taborator expand its functionality.
- Reporting: Generate detailed or summary reports tailored to stakeholders, with options for compliance frameworks like OWASP Top 10 or PCI DSS.
Whether you’re testing DoD systems or classified apps, Burp Suite helps you identify issues like SQL injection, XSS, and IDOR while maintaining compliance and precision.
Master Burp Suite Like A Pro In Just 1 Hour
sbb-itb-bf7aa6b
Installing and Configuring Burp Suite in Secure Environments
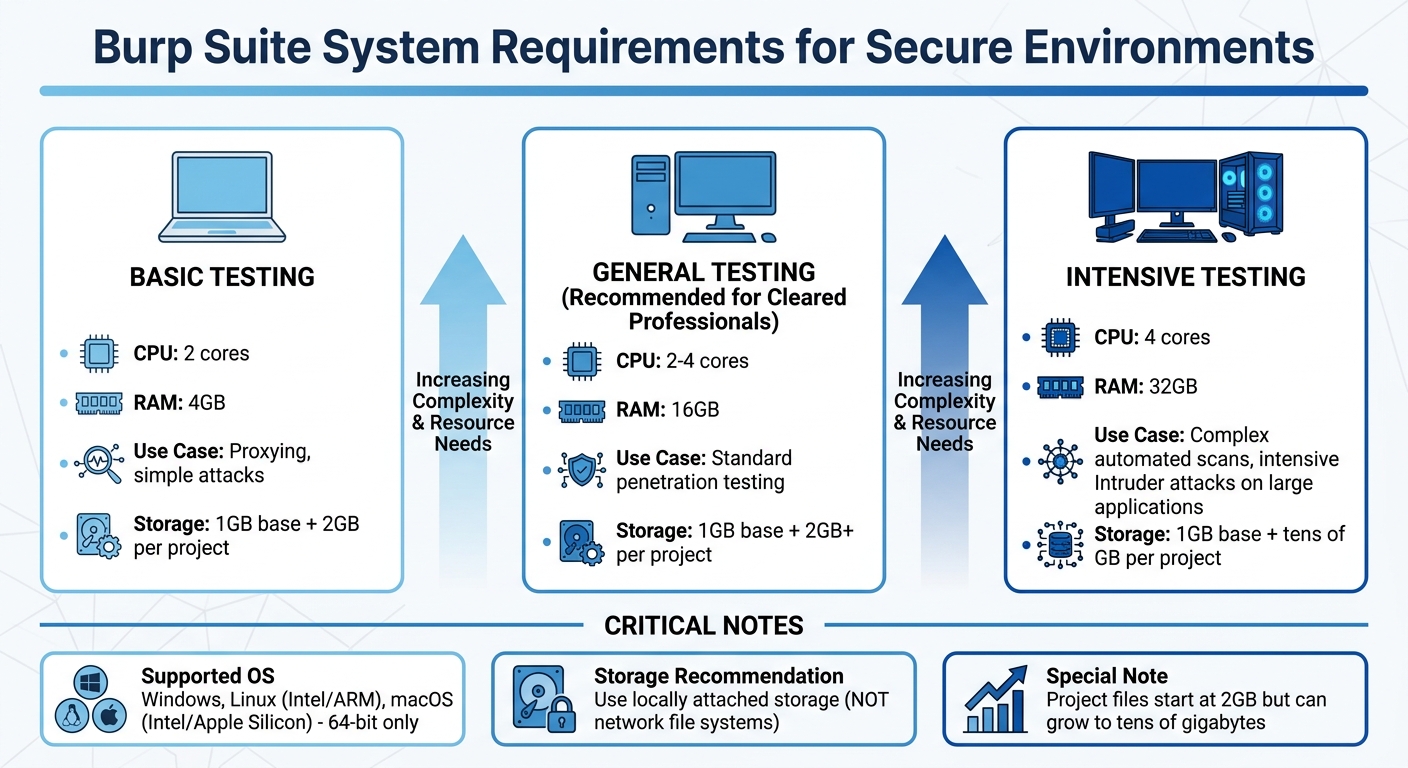
Burp Suite System Requirements by Testing Complexity
Getting the most out of Burp Suite’s advanced tools starts with a secure and carefully planned setup, especially in classified or high-security environments. Unlike a standard installation, deploying Burp Suite in such settings requires extra attention to air-gapped networks, strict access controls, and compliance with security protocols.
System Requirements and Installation
Your hardware setup plays a big role in how smoothly Burp Suite operates. For basic tasks like proxying or simple attacks, a system with 2 CPU cores and 4GB of RAM will work. However, for professionals working in cleared environments, 16GB of RAM is a better choice to ensure smooth performance during general testing. If you’re tackling more demanding tasks like complex automated scans or running intensive Intruder attacks on large applications, aim for 4 CPU cores and 32GB of RAM to avoid slowdowns [2].
Storage is another key consideration. While the base installation only needs 1GB of disk space, project files can quickly grow. Each project file starts at 2GB but can balloon to tens of gigabytes depending on the amount of proxy history and scan data [2]. For best results, use locally attached storage instead of network file systems. Network-based storage can significantly slow down performance during intensive scans [3].
Burp Suite supports 64-bit versions of Windows, Linux (Intel and ARM), and macOS (Intel and Apple Silicon) [2]. The installer includes its own Java Runtime Environment, which is a big plus in restricted environments where external software installations are limited [7]. On Linux, remember to make the installer executable using chmod +x before running it, especially in directories with restricted permissions [7]. If you’re using Ubuntu LTS (recommended), additional packages may be needed to support the embedded Chromium browser [3].
For SCIFs (Sensitive Compartmented Information Facilities) or air-gapped setups, manual activation is the way to go. Generate an activation challenge on the secure machine, transfer it to an internet-connected system, retrieve the response, and complete the activation offline [4].
Once installed, it’s time to configure Burp Suite for secure and compliant workflows.
Configuration for Security-Cleared Workflows
Start by ensuring the Proxy listener is bound to 127.0.0.1:8080 instead of "All interfaces." This prevents unauthorized access or triggering of security alerts by exposing your Burp instance to the network [6]. If you need to use a low port, configure OS-level port redirection [5].
For secure browsing, rely on Burp’s built-in Chromium browser. This browser comes pre-configured with the necessary proxy settings, offering better isolation than external browsers [6][8]. If you prefer an external browser, retrieve the CA certificate from http://burp, then import it into the browser’s trust store under "Authorities." Only select the option to "Trust this CA to identify websites" to maintain a least-privilege setup [6][7]. Browser extensions like FoxyProxy can simplify switching between proxy-enabled and regular browsing modes [6][7].
To stay compliant with clearance protocols, define your target boundaries from the start. Go to the "Target" tab and explicitly list the assets you’re authorized to test. This ensures that all tools, whether manual or automated, stay within those boundaries and avoid scanning unauthorized systems [7].
| Configuration Step | Default | Secure Workflow Recommendation |
|---|---|---|
| Proxy Listener | 127.0.0.1:8080 | Keep on 127.0.0.1; change port only if 8080 is in use |
| Browser Choice | External | Use Burp’s built-in Chromium for better isolation |
| CA Certificate | Not Installed | Install only in dedicated testing browser profiles |
| Target Scope | Empty | Define explicitly before any active scanning |
| Project Type | Temporary | Use "Project on disk" for data persistence and security |
Core Burp Suite Tools for Cleared Pen Testing
Once your secure setup is ready, Burp Suite’s core tools become essential for intercepting traffic, mapping applications, and fine-tuning requests. These tools are indispensable for web application testing in controlled environments, ensuring both compliance and precision throughout your workflow.
Proxy and Browser Integration
Burp Proxy acts as a middleman between your browser and the target application, listening on 127.0.0.1:8080 by default to keep testing traffic contained.
"Burp Proxy sits between your web browser and the target web application. This allows you to view all HTTP/HTTPS traffic passing between the two in real-time." – The CyberSec Guru [9]
The Intercept tab lets you pause requests before they reach the server, offering the ability to inspect and tweak headers, cookies, or parameters. This is particularly handy for bypassing client-side validation. Meanwhile, the HTTP History tab and Inspector panel allow you to make quick changes or analyze past requests without diving into raw text.
If certificate installation is restricted, Burp’s embedded browser comes in handy. For those using an external browser like Firefox in a secure lab, you can export the PortSwigger CA certificate from Burp and import it into the browser’s trust store to enable HTTPS interception.
It’s critical to define your target scope beforehand (as explained in the configuration section). This step filters out unnecessary traffic from operating system updates or browser extensions, ensuring you focus solely on authorized testing targets.
Once proxying is set up, you can turn your attention to mapping the application using Burp’s site mapping tools.
Building Site Maps and Performing Reconnaissance
The site map serves as a detailed blueprint of the target application, organizing data into a hierarchical structure of domains, directories, files, and parameterized requests. URLs you’ve visited appear in black, while inferred ones are grayed out. Icons with colored circles flag security concerns, helping you prioritize testing.
Start with a manual walkthrough using Burp’s browser to capture key functions like login processes and form submissions. If you have the Professional edition, you can enhance this with an automated crawl to uncover additional content.
For grayed-out items, you can right-click and choose "Request in browser" to manually explore potentially hidden features. The Find References feature helps you locate all HTTP responses linked to a specific element, making it easier to track dependencies and understand data flow.
The Target Analyzer provides a bird’s-eye view of application complexity, breaking down static and dynamic URLs and identifying how many parameters each URL accepts. For access control testing, you can map the application with a high-privilege account, then re-map it with a low-privilege session to uncover unauthorized access points.
Once you’ve mapped the site, you can use Repeater to dive into targeted testing and vulnerability validation.
Intercepting and Manipulating Traffic with Repeater
Burp Repeater allows you to move from passive observation to active testing by manually modifying and re-sending individual HTTP requests. You can send any request from the Proxy history or site map to Repeater by right-clicking and selecting "Send to Repeater."
Each request opens in its own tab, letting you test multiple vulnerabilities or endpoints at once. The interface splits into request and response panes, with each tab maintaining its own history for easy comparisons.
In April 2026, a security tutorial highlighted Burp Repeater’s potential when testing a simulated shopping site. By altering a
productIdparameter from an integer to a string, the tester triggered an error response revealing the server was running Apache Struts version 2.2.3.31 – a critical clue for further exploitation.
Hotkeys like Ctrl+R ("Issue Repeater request") can speed up your workflow. Extensions such as Hackvertor (for encoding), 403 Bypasser (for authorization testing), and Param Miner (for uncovering hidden parameters) further streamline testing. The newline (n) button is especially useful for spotting non-printable characters, which can indicate injection flaws. For cross-site scripting tests, enable "Auto-scroll to match when text changes" and use a unique string (e.g., test1337) to quickly locate payload reflections.
| Extension | Primary Use in Repeater |
|---|---|
| Hackvertor | Converts tags for various encodings (e.g., Base64). |
| Taborator | Embeds Burp Collaborator payloads into Repeater requests. |
| Param Miner | Discovers hidden parameters and headers. |
| 403 Bypasser | Tests request permutations to bypass authorization. |
| HTTP Request Smuggler | Configures and executes advanced request smuggling attacks. |
Advanced Techniques for Cleared Web App Testing
Once you’ve got the basics down, it’s time to level up. These advanced techniques help you push your testing capabilities further, especially in secure environments. With Burp Suite’s more sophisticated features, you can automate intricate attacks, perform precise scans in restricted setups, and even expand the tool’s functionality with specialized extensions.
Automating Attacks with Intruder
Burp Intruder lets you automate tailored attacks by re-sending a base HTTP request and injecting payloads into specific positions marked with § characters. It offers four attack modes – Sniper, Battering Ram, Pitchfork, and Cluster Bomb – each designed for different injection scenarios.
To spot vulnerabilities like blind SQL injection, monitor for changes in response length, status codes, and timing. Use the Grep – Match feature to flag strings such as "SQL syntax" or "Internal Server Error" for faster detection.
In secure environments, session persistence is key. Automated attacks can sometimes invalidate sessions after multiple failed attempts. To handle this, use Burp Suite Macros or the Stepper extension to keep session IDs and CSRF tokens updated automatically. Dedicated resource pools for Intruder attacks can also help manage concurrent requests and avoid overwhelming the target application.
If you’re using the Community Edition, curated wordlists are your best friend. Running attacks twice – once with URL encoding enabled and once without – can reveal how the server processes different input formats. For more complex scenarios, like race conditions or multi-step logic, Turbo Intruder offers Python-based scripting for enhanced control.
These automated methods work seamlessly with the scanning strategies discussed next.
Scanning for Vulnerabilities in Secure Environments
Burp Suite Professional provides scan presets designed to balance speed and depth:
- Lightweight: under 15 minutes
- Fast: under 1 hour
- Balanced: a few hours
- Deep: variable duration [11]
For sensitive environments, focus on targeted scans for specific HTTP messages or user-defined insertion points. This minimizes your footprint while concentrating on high-risk areas. Passive scans, which analyze unaltered requests and responses, are particularly effective for initial reconnaissance. To increase precision, manually highlight specific parts of a request (like custom headers or parameters) and select "Scan selected insertion point."
Save and export custom scan configurations to maintain consistent testing across different environments. Since version 2025.3, loading a scan configuration overwrites all current settings because every setting is treated as "edited" by default [11]. You can also create or import custom scan checks (BChecks) to identify vulnerabilities specific to your environment. For easy reference, store important requests and responses in Burp Organizer to avoid re-scanning.
Using Burp Suite Extensions
The BApp Store offers extensions that enhance Burp Suite’s capabilities. Here are some standouts:
- Turbo Intruder: Ideal for high-speed, high-volume attacks or complex logic that standard Intruder can’t handle. It uses a custom HTTP stack and Python-based configuration. As PortSwigger explains:
"Turbo Intruder is intended to complement Burp Intruder by handling attacks that require exceptional speed, duration, or complexity" [13].
Its flat memory usage makes it reliable for multi-day attacks in resource-limited environments.
- Param Miner: Automatically detects hidden, unlinked parameters using advanced diffing and binary search techniques. PortSwigger notes:
"Param Miner combines advanced diffing logic from Backslash Powered Scanner with a binary search technique to guess up to 65,000 param names per request" [14].
Enabling "auto-mining" on in-scope traffic can reveal concealed parameters during manual testing.
- Taborator: Simplifies out-of-band (OOB) testing by using the
$collabplzplaceholder in wordlists, which resolves to a valid Collaborator payload. - Burp Infiltrator: Patches Java or .NET bytecode to track when input reaches potentially unsafe server-side APIs. This provides detailed visibility into the call stack during scans. However, PortSwigger cautions:
"Burp Infiltrator should not be used on production systems… it makes non-reversible changes to application bytecode" [12].
| Extension | Primary Use Case | Integration Method |
|---|---|---|
| Turbo Intruder | Race conditions, massive fuzzing | Python scripting interface |
| Param Miner | Hidden parameter discovery | Right-click and select "Guess Hidden Parameters" |
| Hackvertor | Dynamic encoding/decoding | Tag-based input in request editor |
| Taborator | Out-of-band (OOB) testing | $collabplz placeholder in wordlists |
| Infiltrator | Server-side API monitoring | Bytecode patching (Java/.NET) |
When using Burp Infiltrator in secure setups, ensure both the target application and Burp Suite can connect with the designated Collaborator server. This may require specific firewall exceptions. Burp Suite Professional is available for $449 annually [10].
Reporting and Communicating Findings
Once you’ve completed your testing, the next step is to document and share your findings effectively. Burp Suite Professional makes this process straightforward by offering reporting options in HTML format for stakeholders and XML format for integration into GRC (Governance, Risk, and Compliance) systems [15]. The reporting wizard guides you through selecting issues, adjusting detail levels, and tailoring the output to suit different audiences [15][16].
Generating and Customizing Reports in Burp Suite
To generate a report, head to Target > Site map or Dashboard > All issues, then right-click to choose the issues you want to include. Use the Issues table to filter by severity (High, Medium, Low, Information) and confidence levels (Certain, Firm, Tentative) to ensure the report aligns with your organization’s risk framework [16][18]. This keeps the report focused and avoids unnecessary details.
For vulnerabilities you’ve identified manually, use the "Record an issue" option [17][18]. Include essential details like HTTP service data, paths, and at least two request/response pairs to demonstrate the vulnerability – one showing the injection and another showing the execution [17]. This approach provides solid evidence for auditors and technical teams.
If your organization uses specific reporting templates, export findings in XML format for easy integration into internal systems [15]. Each XML export includes a serialNumber element, which uniquely tags each issue, making it simple to track new and recurring findings across different engagements [19]. After generating an HTML report, preview it in Burp’s internal browser to ensure the layout and details meet your needs before sharing [16].
Best Practices for Communicating Results
Tailor your reports to fit the needs of your audience. For executives and program managers, create "Summary" reports that provide a high-level view of the security posture. For developers and system administrators, generate "Detailed" reports with full request/response data for remediation [19][21]. Summary reports typically include scan details, categorized issues by severity, and an overview of scanned URLs. In contrast, detailed reports dive deeper, offering technical evidence like HTTP requests and responses [21].
To align your findings with regulatory standards, use compliance-based reporting options such as OWASP Top 10: 2025 or PCI DSS v4.0.1 [19]. These formats help non-technical stakeholders grasp risks in a familiar framework. Each issue includes an "Advisory" section summarizing the vulnerability and offering remediation advice, which is critical for meeting regulatory requirements [18]. You can also filter the Issues table by source (e.g., BChecks, Scan checks, Extensions, or Manually generated) to organize findings for different sections of your report [18].
Before exporting, add internal notes using the Comment and Highlight features to flag critical items [18]. This ensures clarity during technical reviews and helps stakeholders focus on actionable information. For vulnerabilities that require more explanation, use Burp Comparer to display side-by-side comparisons of application responses. This visual proof makes it easier to demonstrate how inputs affect the system [20].
Conclusion
Recap of Core Skills and Techniques
To truly master Burp Suite, focus on a methodology-driven approach rather than relying solely on automation. The key skills outlined in this guide – traffic interception with Proxy, manual vulnerability testing with Repeater, and automated fuzzing with Intruder – serve as the backbone of professional penetration testing in secure environments. As security researcher CRUD5th-273- aptly put it:
"Burp Suite is only as powerful as your methodology. Precision over volume. Context over automation." [23]
For cleared professionals, identifying critical vulnerabilities like IDOR, XSS, and SQL injection is a must. Providing reproducible evidence through clear HTTP transcripts and comprehensive reports helps establish credibility as a professional tester. Techniques such as analyzing session tokens with over 10,000 samples at a 99% confidence level [22] or using dual browser profiles to uncover authorization flaws [1] demonstrate the level of rigor expected in classified environments. By mastering these tools and techniques, you contribute to safeguarding critical systems and infrastructure.
The next step? Building on these essential skills through deeper practice and expanding your toolkit.
Next Steps for Cleared Professionals
To further develop your expertise, practice regularly on PortSwigger Academy, which offers free labs designed by the creators of Burp Suite [1][24]. Pair this with hands-on work using intentionally vulnerable applications like OWASP Juice Shop and Damn Vulnerable Web Application (DVWA) to sharpen your exploitation abilities [1][24]. Explore the BApp Store for extensions like Logger++, Turbo Intruder, and AuthMatrix to enhance your testing capabilities [24].
While mastering Burp Suite is essential, it’s only one piece of a broader security toolkit. Complement your Burp skills with tools like Wireshark, Metasploit, and Nmap to further boost your career potential [22]. Consider exploring roles in secure government or defense settings that value Burp Suite expertise.
FAQs
How do I activate Burp Suite offline in an air-gapped lab?
To activate Burp Suite offline in an air-gapped lab, start by generating a license request on the offline machine. Transfer this request securely to an online machine where you can obtain the activation response. Once you have the response, bring it back to the offline machine and import it into Burp Suite. Alternatively, secure workflows like using QR codes or encrypted license files can simplify the process while maintaining security in an isolated environment.
What’s the safest way to intercept HTTPS traffic in a SCIF?
To safely intercept HTTPS traffic within a SCIF, Burp Suite’s proxy features are an effective tool when combined with strict security practices. Use Burp Proxy as a man-in-the-middle (MITM) by installing its CA certificate on authorized devices only. This setup should be implemented in a controlled, isolated environment to prevent any unintended exposure. It’s critical to never share the certificate outside of this environment. Always adhere to your organization’s security protocols to protect confidentiality and maintain data integrity during testing.
How can I keep sessions and CSRF tokens valid during Intruder attacks?
To keep sessions valid and manage CSRF tokens during Intruder attacks, you need to configure Burp Suite’s session handling rules carefully. Set these rules to automatically refresh cookies and update anti-CSRF tokens with every request. This prevents session invalidation and ensures tokens don’t expire, allowing the session to remain active throughout your testing process. Proper setup is key to maintaining uninterrupted testing without manual intervention.