

Rapid7 InsightVM is a vulnerability management platform tailored for government and defense environments. It helps cleared analysts identify risks, prioritize vulnerabilities, and maintain compliance with federal security standards. Key features include:
- Active Risk Scoring: A 0–1,000 scale that factors in real-time threat intelligence, exploitability, and attacker behavior.
- Policy Manager: Ensures compliance with benchmarks like USGCB and FDCC, with options for rule overrides and audit trails.
- Authenticated Scans: Provides deeper visibility into systems but requires more storage and setup.
- Remediation Projects: Tracks vulnerability fixes with clear statuses and integrates with tools like Jira or ServiceNow.
- Reverse Communication: Allows Scan Engines to contact the Security Console in restricted environments.
To optimize performance, use distributed Scan Engines, adjust scan templates, and enable FIPS mode for compliance. This guide covers essential skills like setting up scans, managing credentials, and prioritizing vulnerabilities effectively.
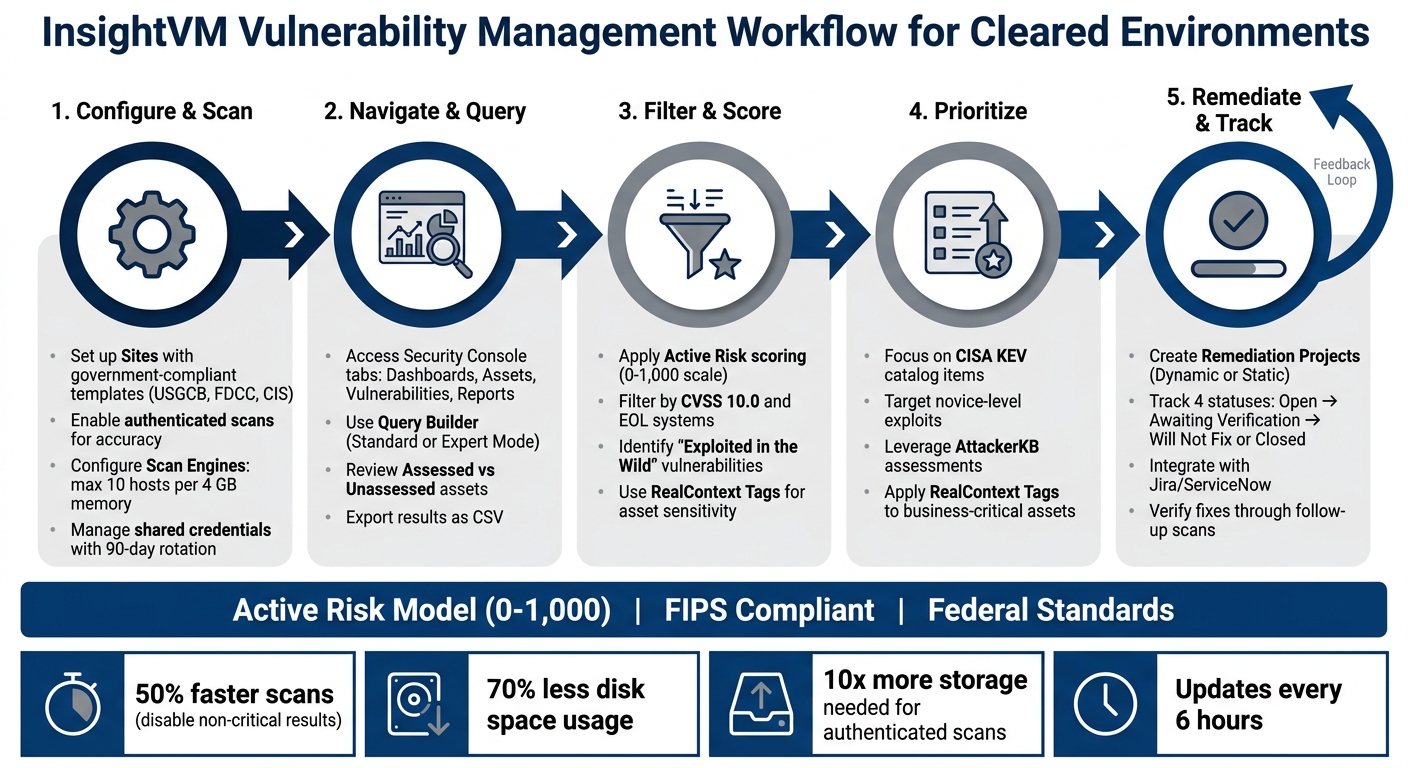
InsightVM Vulnerability Management Workflow for Cleared Environments
How to Navigate the InsightVM Security Console and Vulnerability Database
Understanding the Console Layout
The Security Console is organized with a navigation menu featuring tabs for Dashboards, Assets, Vulnerabilities, and Reports [8]. In the upper-right corner, you’ll find the Query Builder (magnifying glass icon), a tool designed to let you quickly switch between data on assets, vulnerabilities, services, and software using custom queries [9].
The console categorizes assets into two groups: Assessed (those scanned or with an installed agent) and Unassessed (discovered dynamically through systems like LDAP or AWS but awaiting scans) [5]. This distinction makes it easier to stay compliant in environments requiring strict oversight. By default, sessions time out after 10 minutes (600 seconds) [6]. If you’re working on detailed analysis, consider extending this to 30 or 60 minutes to avoid interruptions.
Dashboards are customizable, featuring a drag-and-drop interface with pre-built widgets for real-time monitoring. You can start with Rapid7 templates or design your own dashboards, which can be exported as PDFs. Similarly, Query Builder results can be exported as CSV files. Keep in mind, though, that dates in these CSV files are in epoch format, so you’ll need to apply conversion formulas to make them readable [8].
This intuitive layout ensures you can efficiently access and analyze the vulnerability data you need.
How to Access and Use the Vulnerability Database
The vulnerability database is accessible through the Vulnerabilities tab or the Query Builder tool in the Security Console [3]. It combines research from Nexpose with exploit data from Metasploit, making it a comprehensive resource [4]. Look for these icons to understand vulnerability details:
- Malware icon: Indicates vulnerabilities tied to known malware or exploit kits.
- Metasploit icon: Shows that a corresponding Metasploit module is available.
- Exploit DB icon: Confirms the presence of an exploit in the public Exploit Database [4].
The Query Builder enhances your search capabilities with two modes:
- Standard Mode: Use menu "pills" to define search criteria.
- Expert Mode: Use advanced filters with AND/OR operators (&&, ||) and parentheses for more complex queries [9].
You can also use keyboard shortcuts like Tab, Shift + Tab, and Enter to speed up your workflow [9]. In the Solutions column, a single "pill" represents the best remediation option, while multiple pills indicate the need for further evaluation to determine the most effective solution [4].
This combination of tools and features ensures you can navigate and utilize the database with precision and efficiency.
sbb-itb-bf7aa6b
How to Configure Scans and Manage Shared Credentials
Setting Up Scans in InsightVM
InsightVM organizes scans around Sites and Scan Templates. To get started, create a Site to define the assets you want to scan and apply a government-compliant Scan Template, such as USGCB, FDCC, or CIS benchmarks. These templates are designed to meet federal security standards by including policy checks that align with those requirements [10].
For environments that demand high accuracy, authenticated scans are essential. These scans allow for local checks – like accessing the Windows Registry or package managers – which significantly reduce false positives [11][14]. To improve accuracy further, enable the Reliable Check Correlation setting when using credentials. This ensures the system prioritizes operating system patch checks over less reliable remote methods [14]. Keep in mind, though, that authenticated scans require up to 10 times more disk space than unauthenticated ones [12].
To streamline operations, schedule scans to run automatically. If you need to perform Unsafe checks, limit these to maintenance windows to minimize risks [12][14]. For optimal performance, configure the Scan Engine to scan no more than 10 hosts per 4 GB of memory [13]. If credentials are causing issues, enable the Scan Diagnostics check category to identify problems like SSH privilege elevation errors or difficulties accessing the Windows Registry [11].
Once your scans are set up, the next step is to secure your authentication process by managing shared credentials properly.
Managing Shared Credentials Securely
Shared credentials are a centralized way to manage authentication while adhering to policies like 90-day password rotation [15]. To maintain security, only Global Administrators or users with Manage Site permissions should be allowed to create or edit these credentials, ensuring access is limited to those who truly need it [15].
For added control, restrict credentials to specific IP addresses, CIDR ranges, hostnames, or ports. This prevents the Scan Engine from attempting authentication on unauthorized or irrelevant assets [15]. You can also use the Exclude IP Address field to ensure sensitive or trusted assets within a broader scan range are not scanned [15]. Before deploying credentials across an entire site, test them on a single asset to avoid issues like account lockouts or failed scans [15][17].
After running a scan, review the Authentication column to confirm proper credential use. A Fingerprint Certainty score of 1.0 (100%) indicates full access, while a score of 0.85 (85%) suggests limited access, such as GUEST-level permissions [16]. For compliance with standards like CIS or DISA STIG, make sure to use administrative or root-level credentials [16].
How to Filter, Score, and Assess Vulnerabilities
Using Filters to Identify Critical Vulnerabilities
The Query Builder in the console takes vulnerability investigation to the next level by allowing you to apply targeted filters. Whether you’re in Standard or Expert Mode, these filters help refine your search significantly. Results can also be exported as a CSV file for easier reporting. For those using Expert Mode, you can create more complex queries with logical operators. For instance, you might use a condition like !(asset.software.version = 'foo') to exclude specific software versions from your results [19].
Start by narrowing down vulnerabilities that require minimal technical expertise to exploit. Use the "Exploitable Vulnerabilities by Skill Level" filter and focus on vulnerabilities with a CVSS score of 10.0, which often indicates risks related to end-of-life (EOL) systems. The Site Summary scatter plot is another useful tool, helping you spot outlier assets that demand immediate attention [5]. To further refine your results, you can filter for Validated Vulnerabilities, which are confirmed through Metasploit integration. This ensures your remediation efforts are directed toward verified risks [18]. Additionally, applying RealContext Tags like "Very High" can help you prioritize assets that are critical to your operations.
Once you’ve filtered the vulnerabilities, you can move on to evaluating them using the Active Risk model for a quantitative assessment.
Understanding CVSS Scoring and Risk Models
As of January 21, 2026, the Active Risk model is the only supported scoring strategy, replacing older models like RealRisk and Temporal [1]. Active Risk uses a 0–1,000 scale to score vulnerabilities, combining the base CVSS score with factors like exploitability, threat intelligence, and an "Exploited in the Wild" indicator. Vulnerability definitions are updated every six hours to ensure the latest patch data is included [1][4].
In June 2024, an updated correlation algorithm was introduced, which now identifies vulnerabilities on individual network interface cards (NICs). This enhancement can increase the total vulnerability count by 10% or more in complex environments [5]. When prioritizing remediation efforts, sort vulnerabilities by their Active Risk score. Pay special attention to vulnerabilities flagged as "Exploited in the Wild" or those classified as novice-level exploits [1][4]. These scoring insights enable analysts to align their prioritization with federal security standards effectively.
How to Prioritize and Remediate Vulnerabilities in Cleared Environments
How to Prioritize Vulnerabilities
Start by focusing on vulnerabilities flagged as "Exploited in the Wild" using resources like CISA’s KEV catalog and Rapid7 threat research [1]. These vulnerabilities are automatically given higher weight in the Active Risk model, which scores issues on a 0–1,000 scale, making them easier to identify and prioritize.
Next, fine-tune your prioritization by applying RealContext Tags to your assets. These tags account for the business sensitivity of each asset, ensuring that risk scores reflect the real-world impact on your cleared operations rather than just the technical severity of the vulnerability [1].
Pay special attention to End-of-Life (EOL) systems, which are common in cleared environments where air-gapped systems may still rely on outdated software. Also, prioritize vulnerabilities classified as "Novice" skill level for exploitation, as they can be targeted by a wider range of attackers [4].
Leverage the AttackerKB assessment within the Active Risk model to evaluate the exploitation potential of each vulnerability [1]. This approach shifts focus from theoretical CVSS scores to the vulnerabilities that attackers are most likely to exploit.
Remediation Workflows in InsightVM
After prioritizing vulnerabilities, structured remediation becomes essential. Use Remediation Projects to coordinate efforts between security and IT teams. You can choose between two types of projects:
- Dynamic Projects: Automatically add new vulnerabilities as they are discovered within a defined scope. These are ideal for ongoing maintenance in cleared environments.
- Static Projects: Lock the asset and solution membership at the time of creation, making them better suited for one-time audits or specific remediation sprints [20].
When creating a project, use the Query Builder to define your scope precisely. For instance, you could set up a dynamic project to include all "Critical" vulnerabilities on assets tagged as "Production" within your cleared network [20]. Assign team members, set deadlines, and integrate with tools like Jira or ServiceNow for automated ticket creation, where permitted. In environments where integrations aren’t allowed, use the "Remediator Export" feature to generate a CSV file for offline distribution [20].
Monitor progress using four remediation statuses:
- Open: Vulnerable, no action taken.
- Awaiting Verification: Solution applied but awaiting confirmation through a scan.
- Will Not Fix: Risk accepted due to operational constraints.
- Closed: Vulnerability verified as fixed [20].
The "Awaiting Verification" status is particularly important in cleared environments to ensure high-assurance remediation. A follow-up scan must confirm the vulnerability is resolved before marking it as "Closed" [20].
"Accountability is the number one reason I recommend using Remediation Projects over the Top Remediation or SQL Query Export reports. With Remediation Projects, you can track whenever a solution is resolved, and the number cannot be manually manipulated." – Landon Dalke, Author, Rapid7 [22]
For vulnerabilities that cannot be addressed due to mission-critical constraints, use the "Will Not Fix" status. This recalculates the project’s risk score to reflect accepted risks and keeps an audit trail for compliance purposes [20]. Note that only Global Administrators can create dynamic projects, while Security Managers, Site Owners, and Asset Owners can create static projects for their authorized assets [20].
Best Practices for Using InsightVM in Cleared Cybersecurity Operations
Maintaining Compliance with Security Policies
To meet federal cryptographic standards, start by enabling FIPS mode on your Security Console. This step is essential for cleared environments where encryption and hashing must align with FIPS-compliant algorithms [7].
Leverage the Policy Manager feature to conduct configuration assessment audits against standards like USGCB (2.0 and 1.0), FDCC, and CIS benchmarks [10][24]. Since built-in policies can’t be modified directly, make copies to create customized versions tailored to your organization’s hardening requirements [25][26]. This approach allows you to adjust overly strict rules without losing compliance tracking.
Keep your private keys secure by monitoring the nsc.ks and nscweb.ks keystore files with File Integrity Monitoring (FIM). Additionally, encrypt the underlying filesystem using LUKS for Linux or BitLocker for Windows [23]. Document the creds.kspw file, which stores the keystore encryption key, separately since it’s excluded from standard backups [23].
Replace the default self-signed HTTPS certificate with one issued by an internal Certificate Authority (CA). This improves trust for administrative traffic and resolves login issues on the platform [23][6]. Finally, align your data retention policies with audit requirements: keep scan data for 12 months (for PCI compliance) and asset/agent data for 30 days to automatically clean up inactive devices [23][6].
Here’s a quick overview of recommended retention settings:
| Data Type | Recommended Retention | Purpose |
|---|---|---|
| Scan Data | 12 Months | Legal and audit requirements (e.g., PCI) [23] |
| Asset Data | 30 Days | Removes decommissioned or inactive devices [23] |
| Agent Data | 30 Days | Matches Insight Platform’s default policy [23] |
| Report Data | 6 Months | Clears large historical files to free storage [23] |
Optimizing InsightVM for Cleared Operations
Once compliance protocols are in place, shift your focus to optimizing InsightVM for better performance and scalability.
For environments with over 1,000 assets, prioritize distributed Scan Engines instead of relying solely on the local engine. This prevents resource bottlenecks and ensures the Security Console operates efficiently [23][6]. Place Scan Engines on the same side of the firewall as the assets being scanned to avoid delays caused by perimeter firewalls.
Organize sites by broad geographical regions or functional areas (e.g., "US-East" or "All Corporate") rather than by small IP ranges. This reduces administrative complexity and improves scalability [23]. Use Static Asset Groups and Tags instead of Dynamic Asset Groups (DAGs), as the latter requires resource-intensive database calculations after every scan [23][6].
To speed up scans, disable the "Store non-critical results" option in scan templates. This can cut scan times by about 50% and reduce disk space usage by 70% [6]. Also, turn off "Nmap Services Detection" and "UDP packet sending" if you’re relying on credentials or agents, as these settings can significantly reduce scan durations without sacrificing key data [6].
Adjust product update frequency from the default 6 hours to 24 hours, scheduling updates outside of standard work hours to avoid mid-day disruptions [23][6]. Extend the session timeout from the default 10 minutes to 30 or 60 minutes to minimize frequent re-logins [23][6]. If you increase the Security Console’s RAM after installation, don’t forget to manually run the tune assistant command to optimize PostgreSQL performance for the updated memory allocation [6].
For VPN or bandwidth-constrained networks, deploy Insight Agents to gather authenticated results without transmitting shared credentials [23]. Ensure scan credentials have root or administrator-level permissions for a thorough security assessment of each asset [23]. Lastly, account for the increased disk space requirements of authenticated scans during storage planning [7].
Conclusion and Key Takeaways
Summary of Skills and Practices
Getting the most out of InsightVM calls for a well-thought-out approach to vulnerability management, especially in cleared environments. This guide has walked you through essential practices, like navigating the Security Console, setting up authenticated scans with shared credentials, and adopting the Active Risk strategy. This scoring system (ranging from 0 to 1,000) replaced all older risk models on January 21, 2026. By incorporating live threat intelligence from sources like CISA KEV, AttackerKB, and Metasploit, it prioritizes vulnerabilities based on actual exploit activity rather than theoretical severity [1].
You’ve also learned how to boost efficiency with practical tips. For instance, disabling the "Store non-critical results" option can cut scan times by 50% and reduce disk space usage by 70% [6]. For cleared operations, enabling FIPS mode ensures cryptographic compliance, while the Policy Manager helps audit systems against benchmarks like USGCB or FDCC to stay aligned with regulations [2][3].
This guide’s detailed instructions – from navigating the console to managing remediation workflows – equip you to implement these techniques right away. The strategies covered earlier, such as organizing assets effectively and automating data retention policies, lay the groundwork for scalable and efficient vulnerability management. By building on these practices, you can enhance your operational success.
Next Steps for Cleared Professionals
Now that you’ve mastered the basics, it’s time to take the next steps with InsightVM. Start by fully transitioning to the Active Risk model if you haven’t already. Keep in mind that all legacy models, including RealRisk, Temporal, TemporalPlus, Weighted, and PCI ASV 2.0, were officially phased out on January 21, 2026 [1]. This transition ensures that your prioritization strategies are backed by real-time threat intelligence.
Deepen your platform expertise by mastering the Query Builder to create dashboards for high-priority assets [29]. Use Quick Actions for instant lookups of IPs, domains, or file hashes through services like WHOIS, DNS, or VirusTotal [21]. Streamline your remediation efforts by integrating automated ticketing workflows with tools like Jira or ServiceNow.
Focus on authenticated scanning – it’s your best option for collecting detailed data, including file system and registry insights, which are critical for verifying compliance in secure environments [27][28]. As your confidence grows, explore advanced features like container security assessments and creating custom vulnerability checks (.vck files) tailored to proprietary software in your cleared environment [28]. These skills will help you manage vulnerabilities effectively at any scale while upholding the stringent security standards required in cleared cybersecurity operations.
Rapid7 InsightVM –Vulnerability Analysis, Reporting & Dynamic Assets Filtering – Lab Demo 6 by Jovo
FAQs
How do I choose what to fix first using Active Risk?
To effectively prioritize vulnerabilities in Rapid7 InsightVM, start by sorting them based on their risk score. This score blends CVSS data with real-time threat intelligence, giving you a clear picture of which vulnerabilities are the most dangerous. Focus your efforts on those with the highest risk scores first, as they likely represent the most pressing issues to address in your system.
What’s the safest way to run authenticated scans in a cleared network?
The best approach to running authenticated scans in a cleared network is to use methods that safeguard sensitive credentials. Rapid7 InsightVM suggests using the Scan Assistant, which ensures encrypted communication through ECDSA and AES between the Scan Engine and your assets. This eliminates the hassle of directly managing credentials. Alternatively, you can use securely configured, limited-scope credentials to improve scan accuracy while keeping security intact. Always handle credentials with care and enable authentication only when absolutely necessary.
How can I prove a vulnerability is really fixed in InsightVM?
To ensure a vulnerability has been resolved in InsightVM, start by re-running the original scan. Check the results to verify that the issue no longer appears.
For an extra layer of confirmation, you can use the Rapid7 AppSec Plugin for Chrome to replay the attack. This helps confirm that the attack traffic is no longer present.
If the scan results no longer detect the vulnerability after remediation, you can be confident that the fix was successful.